Introduction: The Importance of Your Graphics Card
In today’s computing world, particularly with applications like gaming, graphic design, and video editing, knowing how to check graphics card Windows 11 is essential. Your graphics card (GPU) plays a pivotal role in rendering visuals and determining the performance capabilities of your computer. With Windows 11, several built-in tools and methods make it easier than ever to verify your graphics card’s details and performance. Whether you’re troubleshooting issues, upgrading hardware, or simply curious, understanding your graphics card is incredibly beneficial.
Checking Graphics Card Information via Device Manager
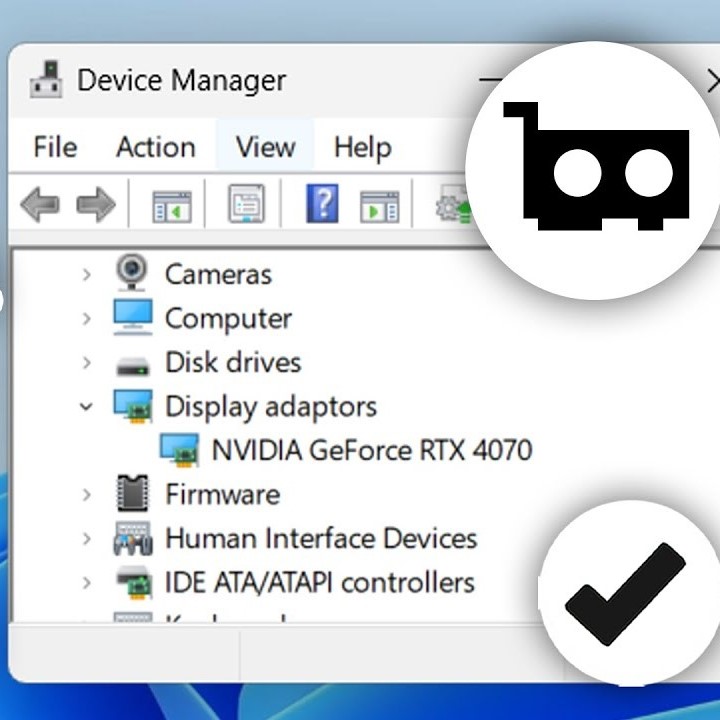
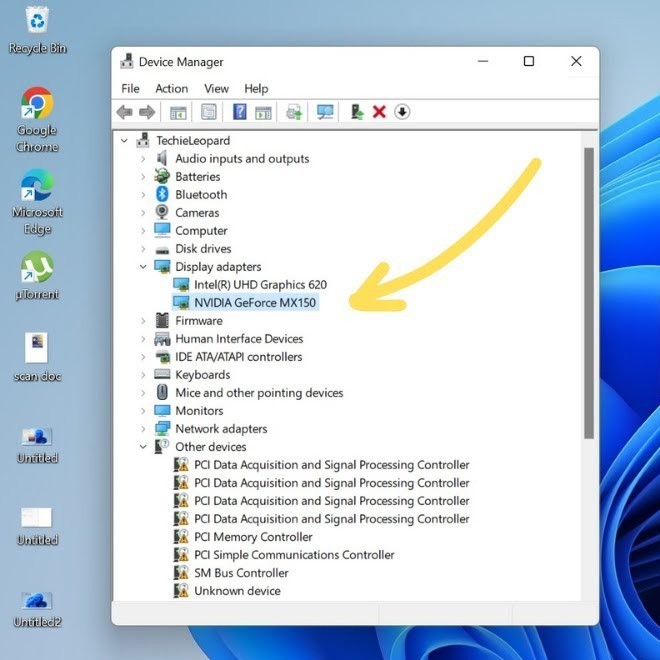
Verifying your graphics card in Windows 11 is straightforward with Device Manager. To start, right-click on the Start menu. Choose ‘Device Manager’ from the options. In the Device Manager window, look for ‘Display adapters’. Click on the arrow next to it. This will show a list of GPUs installed on your system. Here you can see the name of your graphics card clearly listed.
If you need to know more, right-click on your graphics card’s name. Select ‘Properties’ from the context menu. You will find multiple tabs in the Properties window. Check out the ‘Driver’ tab to see driver details. This includes the driver version and the date it was last updated. The ‘Events’ tab can tell you if any recent changes occurred. If you want to check for updates, click ‘Update Driver’ on the ‘Driver’ tab.
Remember to keep the keywords how to check graphics card windows 11 in mind as you move through the process. It’s vital to not just check but also understand your GPU’s capabilities and any potential updates it might need.
Accessing Graphics Details through DirectX Diagnostic Tool
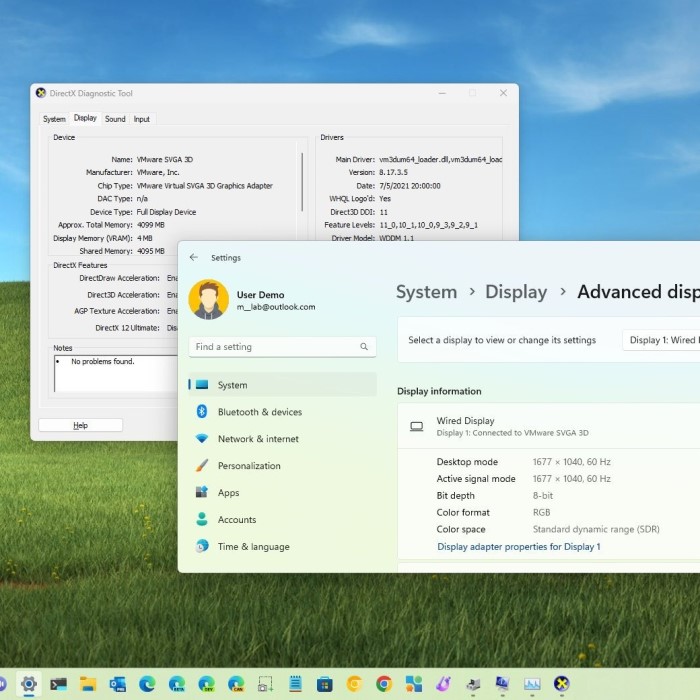
To check graphics card details on Windows 11, the DirectX Diagnostic Tool is effective. Press ‘Windows + R’ and type ‘dxdiag’. Hit enter to open the tool. Once it loads, click the ‘Display’ tab. Here, you’ll find comprehensive graphics card information.
Key details displayed include the GPU make and model, the driver version, and the total memory available. It’s vital for confirming your system’s compatibility with specific games or software. The DirectX Diagnostic Tool also reports on DirectX features supported by your graphics card.
For troubleshooting, the tool lists problems under ‘Notes’. This can help you resolve driver or compatibility issues. Keep in mind how to check graphics card Windows 11 while using the tool. Always ensure you have the latest DirectX version installed for accurate diagnostics.
Using Display Settings for Graphics Card Verification
Another simple method for how to check graphics card Windows 11 is through Display Settings. Follow these steps to access your graphics card information:
- Right-click on your desktop and select ‘Display settings’.
- Scroll down to find ‘Advanced display settings’ and click on it.
- Under the ‘Display information’ section, you can find your monitor’s current resolution and refresh rate.
- Click on ‘Display adapter properties’ for Display 1.
- Within the adapter properties, you will find details on your graphics card, such as its type and available memory.
This method provides basic info about your GPU and its capabilities without needing to dive deeply into system settings. It’s suitable for a quick check or if you are not looking for advanced feature details. Always update your graphics settings to enjoy the full capabilities of your graphics card. Remember, knowing how to check graphics card Windows 11 is handy for tailoring your system’s performance to your needs.
Leveraging System Information to Identify GPU Details
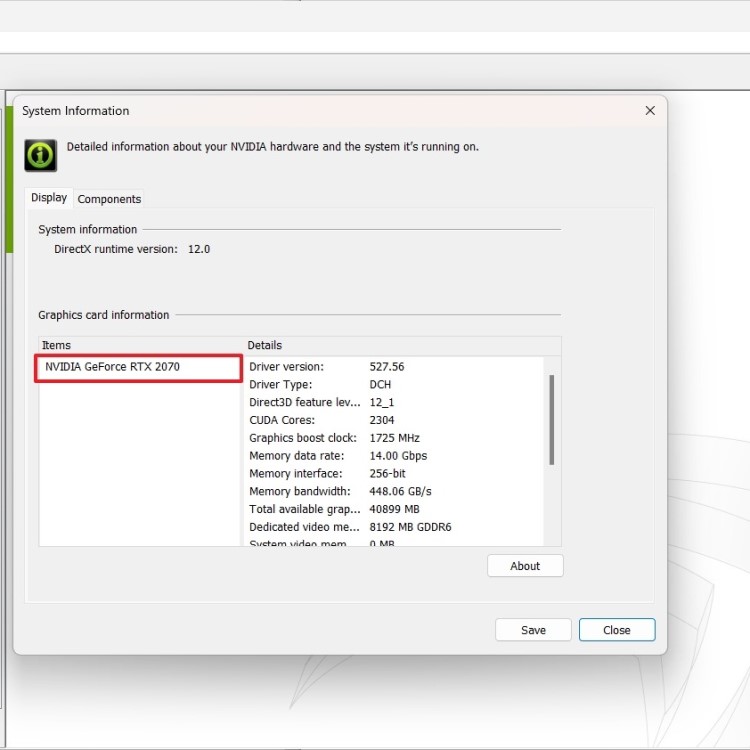
Windows 11 provides another handy tool for how to check graphics card Windows 11; the System Information utility. Here’s how you can use it:
- Type ‘System Information’ into the Windows search bar and open the app.
- In the System Information window, expand the ‘Components’ section on the left.
- Click on ‘Display’ to bring up detailed information about your graphics card.
- You will see your GPU’s name, manufacturer, DAC type, device type, and more.
This method gives you a deeper dive into the specifics of your GPU. It includes data on your graphics hardware that may not be available in other tools. For those needing detailed specs for troubleshooting or upgrades, this is valuable. Checking via System Information is thorough and can reveal insights into your GPU’s architecture. Remember to follow these steps regularly to stay informed about your graphics card details.
Consulting Windows Settings for GPU Specifications
When learning how to check graphics card Windows 11, Windows Settings is another resource. To start, click on the Start menu and then select ‘Settings.’ Alternatively, you can press ‘Windows + I’ on your keyboard. Navigate to the ‘System’ section and then click on ‘Display.’ This will take you to the display settings for your computer.
Once you are in the display settings, scroll down and click on the ‘Graphics’ option. Here, you will find GPU specifications laid out for you to review. It lists graphics cards, if more than one is in use, along with their associated apps. This section is useful for adjusting which GPU a particular app uses, enhancing performance.
In this menu, you can also see information about GPU preferences for apps. It allows you to configure whether an app uses an efficient or high-performance GPU, if available. This is crucial for optimal app performance, especially for graphic-intensive programs.
Don’t forget to apply how to check graphics card Windows 11, even in these settings. Keep your GPU specs in mind when adjusting settings for applications. It helps ensure that apps run smoothly and you get the most from your system’s graphics capabilities.
Exploring Third-Party Software for Comprehensive Graphics Information
While Windows 11 provides various built-in tools for how to check graphics card Windows 11, third-party software can offer more detailed insights. Many of these applications provide in-depth analysis of your graphics card’s performance, temperature, usage, and even overclocking options. Here are common third-party tools to consider:
GPU-Z
- Overview of GPU-Z: GPU-Z is a lightweight utility designed specifically for graphics card information. It is favored by many PC enthusiasts due to its simplicity and effectiveness.
- Comprehensive Information: This tool provides an extensive range of details about your graphics card, including:
- Manufacturer: Identifies the company that produced the GPU, such as NVIDIA or AMD.
- Model: Displays the specific model name, which helps in understanding performance capabilities.
- BIOS Version: Shows the version of the BIOS, essential for troubleshooting and updates.
- Memory Size and Type: Indicates how much video memory the card has and its type (e.g., GDDR6), which are critical for performance in gaming and rendering.
- User-Friendly Interface: One of the main advantages of GPU-Z is its easy-to-use interface. Users can effortlessly navigate through the information without a steep learning curve.
- No Installation Required: GPU-Z can be run directly from a downloaded executable file, meaning you don’t have to go through a lengthy installation process. This feature makes it ideal for quick checks.
MSI Afterburner
- Purpose of MSI Afterburner: While MSI Afterburner is widely known for its overclocking capabilities, it also serves as a powerful monitoring tool for your GPU.
- Real-Time Data Display: The software provides real-time information, allowing you to observe critical GPU metrics such as:
- Clock Speed: Displays the current speed at which the GPU is operating, indicating performance levels during various tasks.
- Voltage: Monitors the voltage being supplied to the GPU, which can affect stability and power consumption.
- Fan Speeds: Shows how fast the GPU’s fans are running, providing insight into cooling efficiency.
- Customization Options: Beyond monitoring, MSI Afterburner allows users to adjust clock speeds and fan profiles, making it a versatile tool for performance tuning.
Speccy
- What is Speccy?: Speccy is a comprehensive system information tool that delivers a detailed summary of your PC’s hardware components.
- Full System Summary: Speccy goes beyond just the graphics card by providing an overview of all major components in your system, including:
- CPU: Information about the processor, such as its model and clock speed.
- RAM: Details regarding the total RAM installed and its specifications.
- Storage Devices: Shows drives connected, including HDDs and SSDs, along with their capacities.
- Quick Overview of GPU Specs: Within this summary, you can find essential details about your graphics card, making it efficient for quickly assessing your system’s specifications.
- User-Friendly Design: Speccy’s interface is intuitive and visually appealing, making it easy for users of all levels to navigate and interpret the information.
HWMonitor
- Purpose of HWMonitor: HWMonitor is a monitoring tool designed specifically to check your system’s health, which includes your graphics card.
- Health Monitoring Features: This software provides vital information, such as:
- Temperature Monitoring: Tracks the temperature of your GPU, which is crucial for preventing overheating that can lead to performance degradation or hardware failure.
- Voltage Readings: Displays the various voltages supplied to your GPU, helping identify any potential power issues.
- Fan Speeds: Monitors the operational speed of your GPU fans, ensuring they are functioning properly to maintain appropriate temperatures.
- Preventing Overheating Issues: By continuously checking these parameters, HWMonitor helps users identify abnormal readings that could indicate overheating risks, allowing for proactive measures before serious damage occurs.
Using third-party software can complement the built-in features of Windows 11 and provide a more comprehensive view of your graphics card’s capabilities. Always download software from trusted sources to avoid any security risks. When using these tools, remember to apply our earlier keyword, how to check graphics card Windows 11, to ensure you’re approaching your hardware verification with the right knowledge.
Understanding Graphics Card Properties via Command Prompt
For those who prefer command-line interfaces, the Command Prompt in Windows 11 can also help with how to check graphics card Windows 11. Here’s a quick guide to get graphics card properties:
Press Windows + S and type Command Prompt. Right-click and select ‘Run as administrator’.
In the Command Prompt, type wmic path win32_VideoController get name and hit enter. This command lists the names of all the graphics cards installed.
To get more details, type wmic path win 32_Video Controller get name, driver date, driver version, status. This provides you with the driver date, version, and status.
This method is helpful for advanced users who need to quickly find GPU specs without a graphical interface. It can also be scripted for automatic reporting. Use this approach if you’re comfortable with more technical procedures when applying how to check graphics card Windows 11.
Checking for Driver Updates and Graphics Card Health
Keeping your graphics card current and healthy is key. Here’s how to check for driver updates and assess the health of your GPU on Windows 11.
How to Update Graphics Card Drivers
To ensure peak performance, update your graphics card drivers. Follow these steps:
- Go to ‘Device Manager’ as mentioned earlier.
- Right-click on your graphics card listed under ‘Display adapters’.
- Click ‘Update Driver’ and choose ‘Search automatically for updated driver software’.
- If an update is available, follow the prompts to install.
Alternatively, visit the manufacturer’s website. Look for the ‘Support’ or ‘Downloads’ section. Find your model and download the latest driver.
Assessing Graphics Card Health
A healthy graphics card is vital for a smooth experience. Monitor its health with these tips:
Check Temperature
- Importance of Monitoring: Keeping an eye on your GPU temperature is crucial for maintaining optimal performance and preventing overheating. Excessive heat can lead to throttling and even permanent damage to your graphics card.
- Using Software: Consider using third-party applications like GPU-Z, which provides real-time data about your GPU’s temperature. This software is user-friendly and offers detailed information about various GPU metrics.
- Safe Temperature Limits: Generally, it is advisable to keep your GPU temperature below 85 degrees Celsius during heavy use, such as gaming or rendering. Knowledge of your specific GPU model’s safe operating temperature range is also beneficial.
Listen to the Fans
- Significance of Fan Noise: The fans in your GPU play a crucial role in maintaining proper airflow and cooling. Unusual noises can be an early indicator of potential problems.
- Identifying Issues: If you hear grinding, rattling, or excessive whirring sounds, it may signal that dust has accumulated in the cooling system or that there are failing components within the fans themselves.
- Regular Cleaning: To prevent fan-related issues, make it a habit to clean your GPU fans regularly. Use compressed air to remove dust buildup, ensuring your fans operate smoothly and efficiently. This task should be part of your general PC maintenance routine.
Look for Artifacts
- What Are Artifacts?: Artifacts are visual anomalies that can appear on your screen, such as strange lines, flickering, or unexpected shapes during graphics rendering.
- Potential Causes: These artifacts may suggest underlying issues with your GPU, possibly stemming from overheating, memory problems, or failing hardware.
- Immediate Action: If you start noticing artifacts while playing games or using graphics-intensive applications, it’s essential to investigate the issue promptly. Ignoring it can lead to more serious GPU problems down the line.
Test with Software
- Using Stress Testing Software: Software tools such as MSI Afterburner can be incredibly useful for assessing your GPU’s performance under load. These tools allow for stress testing, which pushes your GPU to its limits.
- Understanding Load Testing: Conducting a stress test helps you evaluate how well your GPU can handle demanding tasks and whether it maintains stable temperatures during high-performance scenarios.
- Interpreting Results: After running a stress test, analyze the results to determine overall performance, including temperature readings, clock speeds, and stability. If the GPU struggles or overheats, you may need to consider additional cooling solutions or potential upgrades.
Remember to apply these steps within the context of how to check graphics card Windows 11. Keep your system running optimally by regularly checking for updates and maintaining the health of your GPU.
Conclusion: Optimizing Your PC Experience
In summary, knowing how to check graphics card Windows 11 is crucial for optimizing your computer’s performance and ensuring a seamless experience in gaming and creative tasks. With various built-in tools such as System Information, Task Manager, and the DirectX Diagnostic Tool, accessing this information is straightforward. Additionally, understanding your graphics card’s specifications allows for informed decisions when upgrading or troubleshooting. Always remain vigilant about updating your drivers and monitoring performance to get the best out of your GPU. With these tips in mind, you’re well-equipped to harness the full potential of your Windows 11 system and enjoy enhanced graphics performance in every application you use.