
Transferring an eSIM from one iPhone to another can seem daunting at first, but with the right knowledge, it’s a straightforward process. eSIM technology has gained popularity due to its convenience and flexibility. If you’re switching to a new iPhone or simply need to share your eSIM, understanding how to transfer eSIM from one iPhone to another is crucial.
For Apple users, eSIMs offer a lightweight alternative to traditional SIM cards. However, there can be hurdles in transferring this functionality, especially for those who aren’t tech-savvy. Here’s a breakdown of the steps, tips, and common questions regarding eSIM transfer.
Understanding eSIM Technology
What is an eSIM? An eSIM (embedded SIM) allows you to activate a cellular plan without a physical SIM card. Instead, the carrier sends a QR code or activation information that you can use to set things up. This evolution in SIM technology allows multiple profiles and switching between different carriers with minimal hassle, thus revolutionizing how we manage phone services.
For instance, if you travel frequently, having an eSIM could save you from constantly swapping physical SIMs, simplifying your experience. However, despite its advantages, many people still find the transition process confusing and challenging. Understanding the advantages of eSIMs can help motivate users to transfer their plans with ease.
Preparing for the Transfer
How to transfer esim from one iphone to another? The initial step in the transfer process is preparing both iPhones. Ensure that both devices are updated to the latest iOS version. An outdated iOS can lead to functionality issues during the transfer. It’s always a good idea to check for updates in Settings > General > Software Update.
Check your mobile carrier’s compatibility with eSIM to avoid problems. Contact them if you anticipate any issues, as some carriers may require you to unlock your devices or may have unique transfer protocols. Additionally, make sure both iPhones are connected to Wi-Fi, as this process may need internet access.
Gather any pertinent information, like the phone number associated with the eSIM and any passwords or PINs for your carrier account. This preparation can expedite the process significantly. If you haven’t backed up your data recently, consider doing that too to prevent any loss during the transfer.
Step-by-Step Instructions to Transfer eSIM
Step 1: Remove the eSIM from the Old iPhone
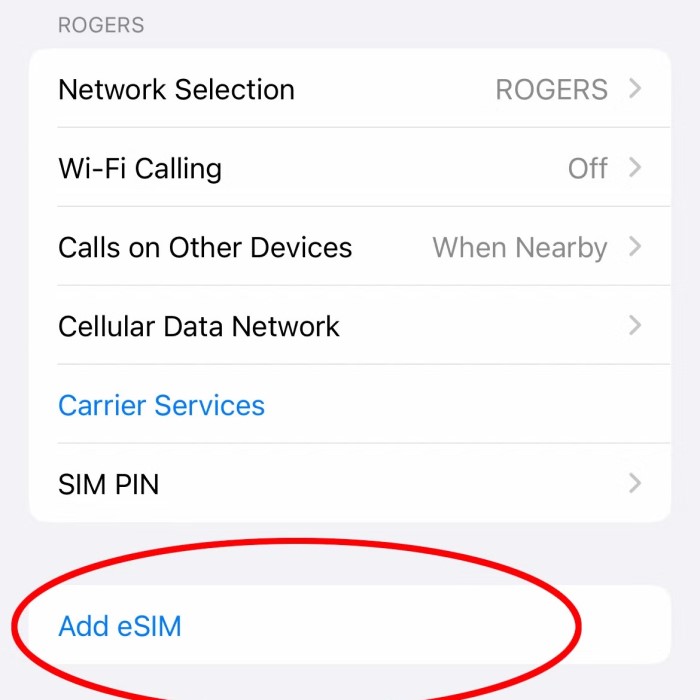
The first step to transfer your eSIM is to remove it from your old iPhone. This might seem intimidating, but it’s quite simple. Open your Settings, then navigate to Cellular > Cellular Plans. Tap on the eSIM plan you want to remove and select Remove Cellular Plan. Confirm your selection, ensuring that this action does not affect your other cellular plans or profiles.
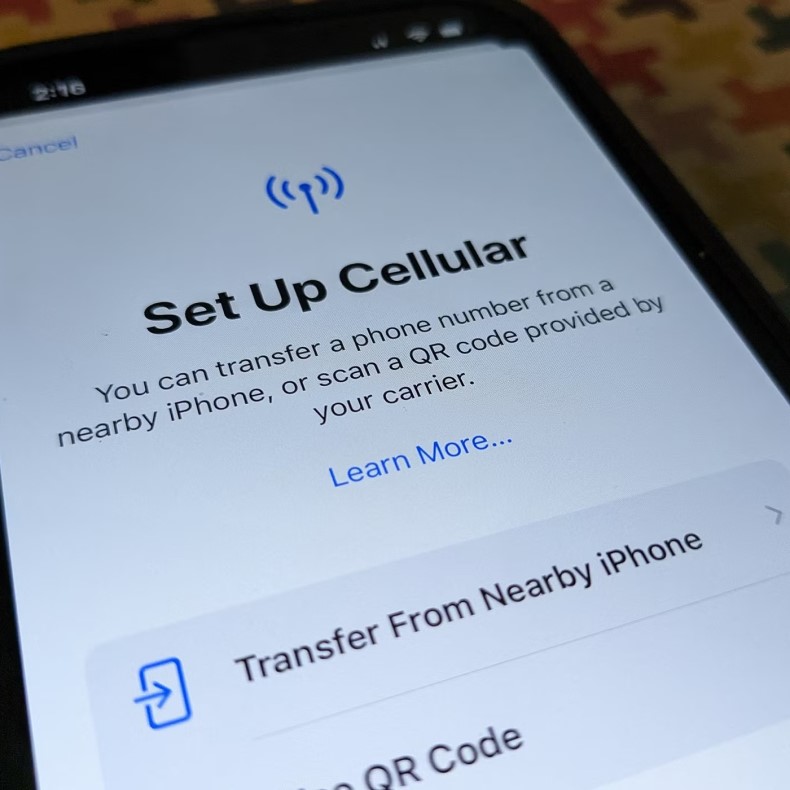
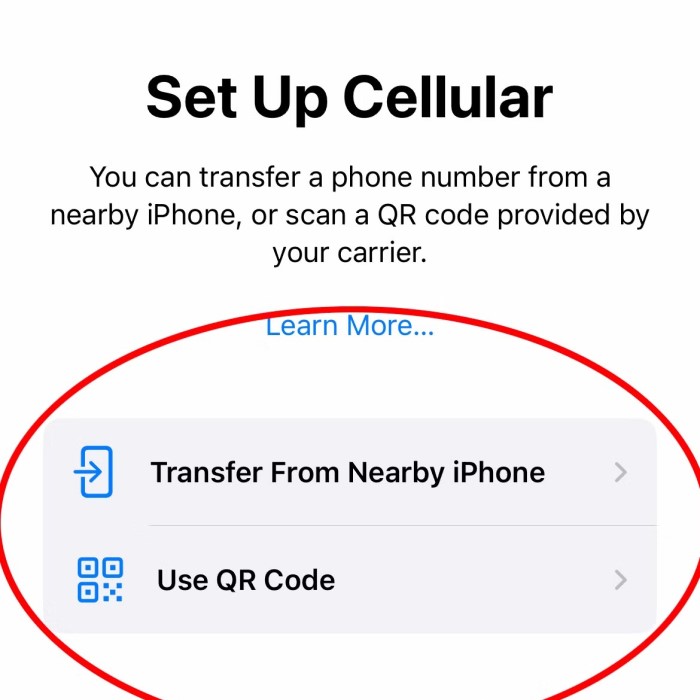
Step 2: Install the eSIM on the New iPhone
Once you have successfully removed the eSIM from the old device, you can move on to the new iPhone. Go to Settings > Cellular > Add Cellular Plan. You will either need to scan a QR code provided by your carrier or enter the details manually. Each carrier often has specific instructions, so it’s wise to check their website or contact their customer service for assistance if needed.
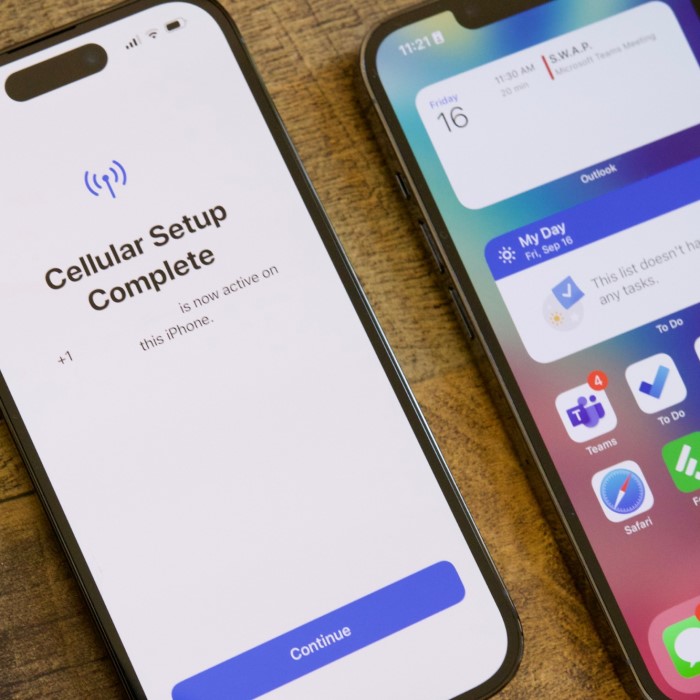
Step 3: Activate the eSIM
After you input the necessary information, your new iPhone will prompt you to activate the eSIM. Follow the onscreen instructions carefully. This might involve signing in to your carrier’s app or website. Look for confirmation from your carrier stating that your eSIM is activated. Ensure everything is complete before you test the service, as a minor oversight could lead to service disruptions.
Common Issues When Transferring eSIM
How to transfer esim from one iphone to another? Transferring eSIM can occasionally lead to complications, even if you meticulously follow the prescribed steps. Below are some common problems users may face:
1. Activation Failure on the New Device
One of the most frequent issues encountered is a failure to activate the eSIM on the new iPhone. This can be frustrating, especially when you believe you’ve followed all the steps correctly. Multiple factors can contribute to this issue:
- Network Connectivity Issues: If either device does not have reliable internet access during the activation process, it may lead to incomplete setup or activation failure. Make sure both phones are connected to a stable Wi-Fi network.
- Unsupported Devices: Some iPhones may not support specific eSIM features or configurations. Always ensure both your old and new devices are compatible with the eSIM service offered by your carrier.
- Carrier Requirements: Different carriers have distinct requirements for eSIM activation. Double-check that both phones meet these prerequisites before attempting the transfer.
2. Double-Checking the Activation Method
If you run into problems during the eSIM transfer, it’s wise to take a step back and reassess the activation method you used. Here are a few considerations:
- QR Code Scanning Issues: If you relied on scanning a QR code for activation, ensure that you have scanned the correct code. Sometimes, a simple error like using the wrong QR code can halt the process.
- Correct Credentials: If manual input of credentials is part of the transfer process, verify that you have entered all details accurately, including any passwords or PINs needed to access your carrier account. Even a small typo can lead to activation failures.
3. Troubleshooting Online Activation
If the online activation process fails, don’t be discouraged. There are a few steps you can take before seeking external help:
- Refresh and Retry: Sometimes, simply refreshing the app or webpage you’re using can solve temporary glitches. Try exiting the application or settings menu and start the activation process again.
- Check for Service Outages: Occasionally, carriers experience outages that can interfere with eSIM activation. Research whether your carrier is facing issues that might be impacting their services.
4. Contacting Your Carrier for Support
If you’ve exhausted your options and are unable to activate the eSIM after double-checking all the aforementioned methods, it may be time to reach out to your carrier. They can offer:
- Technical Support: Customer service agents will typically have access to more detailed troubleshooting steps or may even be able to activate the eSIM for you over the phone.
- Carrier-Specific Guidelines: Every carrier has unique systems and protocols. Contacting them directly can help clarify any potential misunderstandings or supplier-specific issues that may affect your transfer process.
Overall, while transferring your eSIM, it’s essential to stay patient and methodical. Recognizing these common issues and adopting a thorough approach to troubleshoot can significantly ease your transition to the new device.
FAQ: Can I Transfer eSIM to Another iPhone?
Yes, transferring eSIM is possible and is typically a straightforward process as described above. However, keep in mind that each carrier has different protocols. Always be ready to consult your carrier’s website or support team for specific guidelines.
How Do I Transfer My eSIM to My New Phone?
Following the aforementioned steps outlined in this guide, you should be able to transfer your eSIM to a new iPhone without much hassle. Remember to remove it from the old device before activating it on the new one. If all else fails, reaching out to your carrier can provide clarification and assistance in troubleshooting any issues.
Airtel eSIM: Specific Instructions for iPhone Users
If you’re an Airtel user transferring an eSIM from one iPhone to another, the process is largely similar to those outlined above. However, Airtel provides unique QR codes for eSIM activation. Ensure you have your account details and any necessary codes handy when beginning the transfer process. Additionally, you can often manage your eSIM settings using the Airtel app for a smoother experience.
Why Am I Not Able to Transfer My eSIM to My New iPhone?
There can be a few reasons for complications in transferring your eSIM. First, ensure both devices are updated to the latest iOS version. Running older software can significantly hinder your transfer. Check with your carrier to see if your plan supports eSIM transfers; restrictions can vary based on the plan or carrier type.
If you receive error messages during the activation process, they may provide clues as to what’s wrong. Common issues may involve a network outage or an incorrect QR code. Always read the error message carefully, as they often contain information on how to resolve the issue.
Closing Thoughts: Smooth Transition for Your eSIM
Transferring eSIM from one iPhone to another can significantly enhance your telecommunications experience when done correctly. As more users opt for eSIM technology, understanding this transfer process becomes more essential. With the right preparation and knowledge, this operation can be smooth and efficient, allowing you to enjoy your new device without the hassle of constantly switching SIM cards.
In summary, make sure to follow each step carefully, keep your carrier’s contact information handy, and seek out online resources for further assistance as needed. Adopting eSIM technology brings about conveniences that make managing wireless plans a breeze, and learning how to transfer eSIM from one iPhone to another takes you one step closer to maximizing that convenience. Happy transferring!