Introduction to Graphics Cards
Before we delve into how to check graphics card windows 10, let’s brief on graphics cards. A graphics card is crucial for rendering images on your monitor. It converts data into a signal your monitor can understand. Better graphics cards improve visuals and performance in gaming and video editing. Often, they come integrated into the motherboard or as a separate hardware piece. Knowing your graphics card specs can help you assess if an upgrade is needed or troubleshoot issues. Stay tuned as we explore different methods to check your graphics card in Windows 10.
Accessing Device Manager in Windows 10
To check your graphics card in Windows 10, Device Manager is a reliable tool. It’s a system utility that lets you view and control the hardware attached to your computer. Here’s a simple guide to using Device Manager:
- Open Device Manager: Right-click the Start menu button and select ‘Device Manager’ from the context menu. Alternatively, press ‘Windows Key + X’ and choose ‘Device Manager’.
- Find Display Adapters: In the Device Manager window, look for the ‘Display adapters’ section. Click the ‘>’ icon to expand this category.
- View Your Graphics Card Details: Under ‘Display adapters’, you’ll see your graphics card listed. Clicking on it will reveal the name, manufacturer, and other details of your graphics card.
- Check for More Information: If you need more info, right-click the graphics card and select ‘Properties’. This will open a window with tabs that provide further details about the graphics card’s specifications and driver information.
By following these steps, you can quickly learn how to check graphics card windows 10 using Device Manager. It’s a straightforward process that doesn’t require any additional software.
Using Display Settings to Identify Your Graphics Card
Apart from the Device Manager, Windows 10 also offers a simple way through its Display Settings to check your graphics card. This method is quick and does not require deep navigation through system settings. Here’s how you do it:
- Navigate to Display Settings: Right-click on your desktop background and select ‘Display settings’. This will take you to a screen where you can adjust your display’s appearance.
- Scroll to Advanced Display Settings: At the bottom of the Display settings page, you’ll find a link to ‘Advanced display settings’. Click on this to move forward.
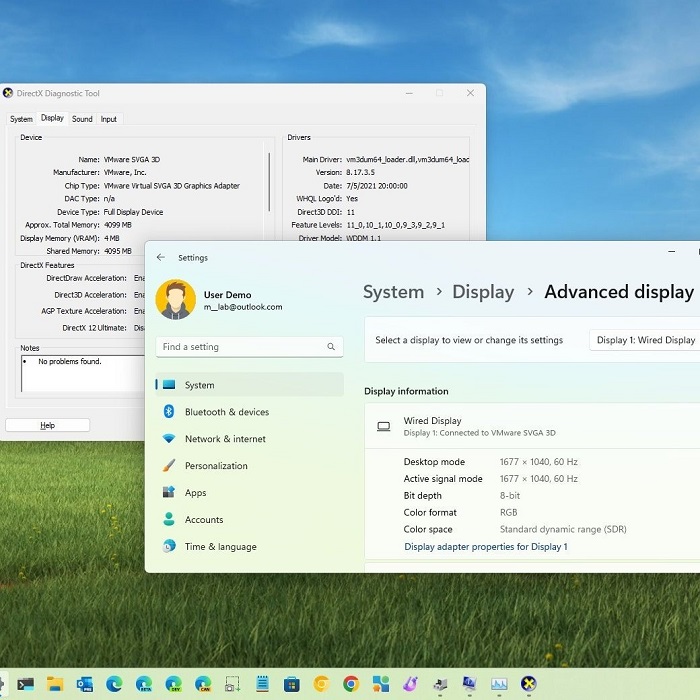
- Check Your Graphics Card Information: In the Advanced display settings, you will find information about your display, such as resolution and refresh rate. There will also be a section named ‘Display adapter properties’. Click it to see your graphics card details.
- Review the Adapter Tab: A new window will pop up, showing multiple tabs. Click on the ‘Adapter’ tab to find information about your graphics card, including the type and memory it possesses.
While this method doesn’t always show as much detail as the Device Manager, it is certainly straightforward. It’s useful for a quick check or to confirm the basic type of graphics card your system is using. Keep in mind that for more comprehensive details, you may need to refer back to Device Manager or use additional software.
Checking Graphics Card Properties
Accessing the detailed properties of your graphics card in Windows 10 can provide valuable insights into its capabilities and performance. By checking the properties, you can obtain specific information which includes the graphics card model, available memory, driver version, and supported features. Here’s how you can delve deeper into the properties of your graphics card:
- Open Graphics Card Properties: Follow the steps to access Device Manager and locate your graphics card under ‘Display adapters’. Right-click on the graphics card and choose ‘Properties’.
- Explore the Tabs: In the Properties window, you have multiple tabs such as ‘General’, ‘Driver’, ‘Details’, and ‘Events’ that give you various information about your graphics card.
- Examine the General Tab: This tab usually shows the status of your device to ensure it’s working correctly.
- Driver Tab: Here, you can see the installed driver’s details, update the driver, or roll back to a previous version if necessary.
- Details Tab: For more technical specifics, this tab allows you to select and view properties from a drop-down menu, such as hardware IDs or power management settings.
- Events Tab: This will show a log of all the events related to your graphics card, which can help in troubleshooting issues.
Understanding these properties is essential for assessing your graphics card’s current status and to troubleshoot or ensure optimal performance. Whether you need to update drivers or confirm compatibility with a new game or software, these detailed insights on how to check graphics card windows 10 can be beneficial.
Utilizing DirectX Diagnostic Tool
Another effective method to check your graphics card is using the DirectX Diagnostic Tool. This built-in Windows tool not only gives you information about your graphics card but also about other multimedia components. Here is how to use it:
- Open the Run Dialog Box: Press ‘Windows Key + R’ to open up the Run dialog box.
- Launch the Tool: Type in ‘dxdiag’ and hit Enter. This action opens the DirectX Diagnostic Tool.
- Navigate to the Display Tab: Look for and click on the ‘Display’ tab in the DirectX Diagnostic Tool window.
- Review Graphics Card Information: Here you will see details about your graphics card. The information includes the device name, manufacturer, and total memory.
- Save All Information (Optional): If you want to keep the details for later reference, click the ‘Save All Information’ button. This will let you save your graphics card’s data as a text file.
- Exit the Tool: After checking, close the tool by clicking the ‘Exit’ button at the bottom of the window.
The DirectX Diagnostic Tool is vital in learning how to check graphics card windows 10, especially when troubleshooting display or audio problems. It can provide crucial data that may not be visible in Device Manager or Display Settings.
Exploring Third-Party Software Options
When looking at how to check graphics card Windows 10, third-party software can be very helpful. These tools offer detailed information and sometimes more than what Windows provides. Here are some popular options:
- GPU-Z: This software is free and easy to use. It provides an in-depth look at your graphics card, including its specs, the GPU load, temperature, and even overclocking options.
- MSI Afterburner: While it’s designed for MSI graphics cards, Afterburner works with most GPUs. It gives detailed data on performance and allows you to adjust the fan speed and clocks.
- Speccy: Speccy is a comprehensive system information tool. It lists all hardware components, including your graphics card’s details. It’s simple and clear.
- HWiNFO: For tech-savvy users, HWiNFO shows a wide range of information. It includes system diagnostics and real-time monitoring of components.
Using any of these tools is quite straightforward:
- Download and Install: Choose a software and download it from the official website. Follow the prompts to install it on your Windows 10 machine.
- Run the Software: Open the program and navigate to the section about graphics cards. Here, you will find various tabs and options to explore the details of your GPU.
- Analyze the Information: These programs provide plenty of data. Make sure to understand what each metric represents to make the best use out of it.
It’s crucial to download such software from trusted sources to avoid malware. Always check reviews and ratings before downloading. Third-party software solutions provide not just a snapshot of your graphics card’s current status but also historical data and performance logging. This can be incredibly useful if you’re monitoring your GPU’s health over time or trying to troubleshoot a specific issue.
Interpreting Graphics Card Information
Once you’ve gathered data on your graphics card, it’s important to understand what it means. Interpreting this information correctly can influence decisions about upgrades or troubleshooting. Let’s break down some key aspects you might encounter:
Graphics Card Model: This tells you the exact model of your GPU. It helps you find specific drivers or determine performance benchmarks.
Video RAM (VRAM): This is the memory your graphics card uses to store image data. More VRAM usually means smoother rendering of high-resolution images and videos.
GPU Clock Speed: The speed at which your GPU runs. Higher clock speeds can translate to better performance.
Driver Version: Drivers control how the graphics card operates. Keeping them updated ensures optimal performance and compatibility with new games and software.
DirectX Version: This shows which version of DirectX is supported. Newer versions improve the ability to handle complex graphics tasks.
Knowing what each specification means allows you to assess if your system is ready for specific tasks, such as gaming or video editing. It also helps pinpoint problems when your PC doesn’t perform as expected. Use this information from various sources like Device Manager, Display Settings, DirectX Diagnostic Tool, or third-party software to make informed decisions.
When your findings point to outdated or underperforming hardware, consider upgrading your graphics card. If you’re experiencing issues, check for driver updates or compatibility problems with applications. Knowledge is power, and understanding how to check graphics card windows 10 puts you in control of your system’s graphics capabilities.

Updating Graphics Card Drivers
Keeping your graphics card drivers up to date is key to ensuring your system runs smoothly. Updated drivers can fix bugs, improve performance, and offer new features. Here’s a step-by-step guide on how to update your graphics card drivers in Windows 10:
Device Manager Method
- Accessing Device Manager
To begin the process of updating your graphics driver, first, you need to access Device Manager. You can do this by right-clicking on the Start menu icon (or pressing the Windows key + X) and selecting “Device Manager” from the list. This will open a window displaying all the devices connected to your computer. - Finding Your Graphics Card
In the Device Manager window, look for the category labeled “Display adapters.” Click the arrow next to it to expand the section, which will reveal your graphics card(s). It’s important to identify the correct graphics card that you want to update, especially if you have multiple graphics solutions installed. - Updating the Driver
Right-click on your graphics card name, and from the context menu, select “Update driver.” This option initiates the driver update process. A dialog box will appear, presenting you with different ways to search for updated drivers. - Searching for Updates Automatically
In the next window, choose the option that says “Search automatically for updated driver software.” This instructs Windows to search your computer and the Microsoft online database for any available updates for your graphics driver. - Installation of Updates
If Windows finds an updated version of your driver, it will automatically download and install it for you. After the installation is completed, you may need to restart your computer for the changes to take effect, ensuring that the new driver is correctly integrated into your system.
Graphics Card Manufacturer’s Website
- Visiting the Manufacturer’s Website
An alternative method for updating your graphics driver is to visit the official website of your graphics card’s manufacturer. Minor brands like NVIDIA, AMD, or Intel manage their own resources for driver updates. Finding the right site is crucial, so ensure you navigate to the official page to avoid any third-party risks. - Locating the Drivers Section
Once on the website, look for a section labeled “Drivers” or “Support.” This section is typically easy to locate, as manufacturers make driver updates readily available for their users. The design may vary, but common areas to find driver updates include menus on the homepage or prominent banner messages. - Entering Your Graphics Card Model
In the Drivers or Support section, you will often find options to enter your graphics card model. This may require you to know your exact model, which you can typically find in Device Manager, as mentioned earlier. Once entered, the website will direct you to the latest drivers available for download. - Downloading the Driver
Follow the prompts to find and select the latest driver that matches your system’s specifications. Make sure to choose the correct version for your operating system (Windows 10, Windows 11, etc.) to avoid compatibility issues. After selecting the appropriate driver, click to begin the download process. - Installing the Driver
Once the download is complete, open the downloaded file and follow the installation instructions provided. Usually, the setup wizard will guide you through the process. After installation, remember to restart your computer to apply the changes.
Windows Update
- Using Windows Update for Driver Updates
Another efficient way to update your graphics drivers is through Windows Update. Microsoft often bundles driver updates for hardware in its regular updates, making this an easy method for users who prefer not to handle drivers manually. - Accessing Settings
Start by navigating to your computer’s settings. You can do this by clicking the Start button and selecting the gear icon to access the Settings menu. This is often found directly above the power icon in the Start menu. - Navigating to Update & Security
Within the Settings window, find and click on the “Update & Security” option. This section contains various update-related choices, allowing you to manage and check for updates easily. - Checking for Updates
Click on the “Check for updates” button under the Windows Update tab. Windows will begin to search for any pending updates, which may include crucial driver updates for your graphics card. - Installing Available Updates
If any updates are found, both for Windows and drivers, you will be prompted to install them. Follow the on-screen instructions, and once the updates are downloaded and installed, restart your computer. This ensures that all updates, including the graphics driver, are fully integrated into your system.
Using Third-Party Software
- Exploring Third-Party Driver Update Tools
If you prefer a more automated approach, third-party software can help manage driver updates. Tools such as GPU-Z and MSI Afterburner not only provide information about your graphics card but also aid in the update process. - Installing Driver Update Software
First, download the desired software from a reputable source. Make sure to select the official website or an established software distribution platform. After downloading, follow the installation instructions provided to set up the program on your computer. - Using the Software to Check for Updates
Once installed, open the application and navigate to the section for driver updates. Most of these tools will automatically scan your system for outdated or missing drivers, including your graphics card. - Automating the Update Process
Many third-party applications will offer an automated option to download and install available updates. This feature simplifies the process, allowing users to skip manual searches or installations. - Receiving Notifications
Some tools also allow you to set notifications for future updates. You can customize settings so that when newer drivers become available, the application alerts you. This feature ensures that you stay up-to-date without having to check manually.
Remember, it’s crucial to restart your computer after installing new drivers. This ensures that the updates are applied correctly. Regular driver updates can help avoid compatibility issues and maintain peak performance for games and other graphics-heavy applications. When in doubt, referring to the manufacturers’ guidelines is best. Be cautious of third-party websites claiming to offer driver updates; they might not be trustworthy. Always stick to the official channels for downloading drivers to keep your system secure.
Conclusion: Mastering Graphics Card Checks on Windows 10
In conclusion, knowing how to check graphics card Windows 10 is essential for anyone looking to optimize their computer’s performance. By following the steps outlined in this article, you can easily identify your graphics card and gain valuable insights into its capabilities. Whether you use Device Manager, the DxDiag tool, Task Manager, or third-party software, each method provides comprehensive information tailored to your needs.
With this knowledge in hand, you can make informed decisions about upgrades, troubleshoot issues, and enhance your overall computing experience. The capability to check your graphics card effectively empowers you to ensure that your system meets your demands, especially for gaming and design tasks. Now that you have mastered these techniques, you’re ready to explore the full potential of your Windows 10 graphics capabilities!