
Introduction: The Importance of Wiping a Hard Drive
In today’s digital age, it is more critical than ever to protect your personal information. When we think about data security, many people often overlook the necessity of properly wiping their hard drives before selling, donating, or disposing of their computers. Knowing how to wipe a hard drive not only safeguards your sensitive information but also keeps you compliant with data protection regulations. This guide will provide you with easy-to-follow steps for wiping your hard drive securely, ensuring total data privacy and peace of mind.
Understanding the Need to Wipe a Hard Drive
1. Risks of Not Wiping Your Hard Drive
Failing to wipe your hard drive can lead to severe consequences. When you sell or dispose of a computer, any data left on the hard drive can be accessed by anyone with basic computer skills.
- Data Theft: Personal information such as social security numbers, bank details, and private correspondence can fall into the wrong hands, leading to identity theft and financial losses.
- Legal and Compliance Issues: Many businesses are subject to data protection regulations. If personal or sensitive data is not destroyed before disposing of IT assets, there can be legal repercussions and hefty fines.
- Identity Fraud: Information from old computers can be used to create fake identities, allowing criminals to commit fraud.
2. Understanding Data Deletion Methods
It’s essential to understand that simply deleting files or formatting a drive does not fully erase data. Here’s how data is typically deleted and the implications.
- Basic File Deletion: When you delete files from your computer, they are often moved to a recycle bin or marked as deleted but remain on the hard drive until overwritten by new data, making recovery possible.
- Formatting a Drive: Formatting can give the illusion of erasure, but it typically only removes the index of files, not the files themselves. Recovery tools can easily restore this data.
- Wiping vs. Deleting: Wiping involves overwriting all data on a drive to ensure it is not recoverable. This is the most effective way to ensure your information is permanently erased.
Methods for Wiping a Hard Drive
1. Built-in Operating System Tools
How to wipe a hard drive? Most operating systems come equipped with built-in tools that make it easy to wipe a hard drive. Here’s how to use these tools effectively:
Windows Operating System
- Using Windows Reset:
- Open Settings and navigate to Update & Security.
- Click on Recovery and select Get Started under Reset this PC.
- Choose the option Remove everything to wipe personal files and settings.
- Select Remove files and clean the drive for a thorough wipe. This option is slower but ensures the data is unrecoverable.
- Using Command Prompt:
- For advanced users, you can use Command Prompt to format the hard drive. Type
diskpart, thenlist disk, choose your disk number usingselect disk X, and execute the commandcleanto wipe all data.
- For advanced users, you can use Command Prompt to format the hard drive. Type
macOS
- Using Disk Utility:
- Restart your Mac and hold down Command + R to enter Recovery Mode.
- Open Disk Utility from the macOS Utilities window.
- Choose the hard drive you want to wipe and click on Erase.
- Select a format (like APFS or Mac OS Extended) and, importantly, click on Security Options to choose how thoroughly you want to wipe the drive. The more secure options perform multiple overwrites to erase data effectively.
2. Using Third-Party Data Wiping Software
For users seeking complete data destruction, third-party software may offer the best method for wiping a hard drive. Several reputable programs make the process easy and effective:
- Popular Options:
- DBAN (Darik’s Boot and Nuke): A powerful tool designed for erasing hard drives. It runs from a bootable USB or CD and provides options for multiple overwrites.
- CCleaner: Alongside its system optimization features, CCleaner provides a tool to securely wipe drives.
- Eraser: An open-source program that lets you schedule wipes and securely erase files with customizable overwriting options.
- How to Use Third-Party Software:
- Download and install the software.
- Select the drive you wish to wipe.
- Choose the level of security—some programs allow various overwriting options, such as single-pass vs. multi-pass wipes.
- Initiate the wiping process and wait for it to complete.
3. Physical Destruction of the Hard Drive
For irreversible data removal, physically destroying a hard drive is an option. This is typical for individuals or businesses that are dealing with highly sensitive information.
- Methods of Destruction:
- Drilling Holes: Drilling multiple holes through the hard drive can effectively render it unusable.
- Shredding: Specialized electronic shredders can physically destroy the device, ensuring data cannot be recovered.
- Degaussing: This method involves using a strong magnetic field to disrupt the hard drive’s magnetic storage, effectively erasing all data.
- Environmental Considerations:
- Ensure any destroyed materials are recycled according to local electronic waste disposal guidelines.

Steps to Wipe a Hard Drive: A Comprehensive Guide
1. Back Up Important Data
How to wipe a hard drive? Before beginning the process of wiping your hard drive, it’s essential to back up important files and data:
- Identifying Important Files: Make a list of all critical documents, photos, and applications you wish to keep.
- Backup Solutions:
- Use external hard drives, USB flash drives, or cloud storage options (like Google Drive, Dropbox, etc.) to store your backups.
- Verify Your Backup: After transferring data, confirm that all files are accessible in your backup storage.
2. Prepare Your Computer for Wiping
Proper preparation can streamline the wiping process:
- Disconnect All External Drives: Remove any external drives to prevent accidental data loss.
- Ensure Power Supply: For laptops, connect to a power source to avoid shutdowns during the process.
3. Select Your Wiping Method
Choose a method from the ones discussed above based on your level of comfort with technology and the sensitivity of the data on your hard drive.
4. Execute the Wiping Procedure
Follow the necessary steps for the chosen method:
Built-In Tools
- Utilizing Windows Tools:
- Open the Settings app on your Windows computer by clicking the Start menu and selecting the gear icon.
- Navigate to Update & Security and then click on Recovery.
- Under the Reset this PC section, click on Get Started to begin the process.
- Choose the option to Remove everything if you want to wipe all data from the drive completely.
- Select whether to Just remove my files or Remove files and clean the drive, with the latter providing a more thorough wipe.
- Using macOS Tools:
- Restart your Mac and immediately hold down Command + R to boot into Recovery Mode.
- In the macOS Utilities window, select Disk Utility and click Continue.
- In Disk Utility, select the hard drive or partition you want to wipe from the left column.
- Click on the Erase button at the top, and choose a format (such as APFS or Mac OS Extended).
- Click on Security Options to determine how thoroughly you want to erase data—higher security options will overwrite data multiple times.
Third-Party Software
- Selecting the Right Software:
- Research and choose a reputable data-wiping software, like DBAN, CCleaner, or Eraser, that suits your needs based on the features and reviews.
- Download the installation file from the official website, ensuring that it’s free from malware or adware.
- Installation Process:
- Follow the on-screen instructions to install the software on your computer.
- When prompted, choose the appropriate setup options. Opt for a quick installation if you prefer to have the defaults set.
- Executing the Wiping Process:
- Open the software and locate the option for data wiping or erasing.
- Select the specific drive you wish to wipe from the list of available drives.
- Configure the overwriting settings, such as the number of passes (higher numbers typically mean more security).
- Begin the wiping process by clicking the appropriate button or option within the software interface. Monitor the progress bar to know when the operation is complete.
Physical Destruction (if applicable)
- Planning for Physical Destruction:
- Assess whether physical destruction is necessary based on the sensitivity of the data. If so, consider options like shredding or drilling rather than simply tossing the hard drive away.
- Gathering the Right Tools:
- Ensure you have essential tools on hand, such as a power drill, screwdriver, heavy-duty gloves, safety goggles, and any other equipment needed for safe destruction.
- If using a hard drive shredder, confirm that it’s designed for electronic devices and can handle the materials of your specific hard drive.
- Following Safety Precautions:
- Wear safety goggles and heavy-duty gloves to protect yourself from debris or sharp metal edges during the destruction process.
- Follow the manufacturer’s instructions for any specialized tools or equipment to ensure safe operation.
- Choose a well-ventilated area to perform the destruction to avoid inhaling any fumes from the materials.
- Performing Destruction:
- When ready, carefully dismantle the hard drive using tools like screwdrivers to access the internal components.
- If drilling, make secure placements to avoid slippage and ensure uniform destruction across crucial data sectors.
- After the destruction is complete, responsibly dispose of the remaining materials according to local electronic waste disposal regulations.
5. Verify the Data Removal
Post-wipe verification ensures your hard drive has been adequately cleared:
- Use Recovery Software: After wiping, consider using data recovery software to check if any files are still recoverable. There should be no recoverable data if the wiping was successful.
- Confirm Wipe Completion: If you’ve used wiping software, verify the reports provided by the tool indicating a successful wipe.
Frequently Asked Questions (FAQ)
How Do You Completely Erase a Hard Drive?
To completely erase a hard drive, use specialized data-wiping software that overwrites data multiple times or built-in OS tools that provide secure formatting options.
How Do I Wipe My Hard Drive Before Donating My Computer?
Back up your data first. Then, use your operating system’s built-in tools or third-party wiping software to ensure all personal information is permanently erased before donating.
Is It Possible to Completely Wipe a PC?
Yes, it is possible to completely wipe a PC using the methods discussed, including built-in OS tools and dedicated software, which ensure that all data is irretrievable.
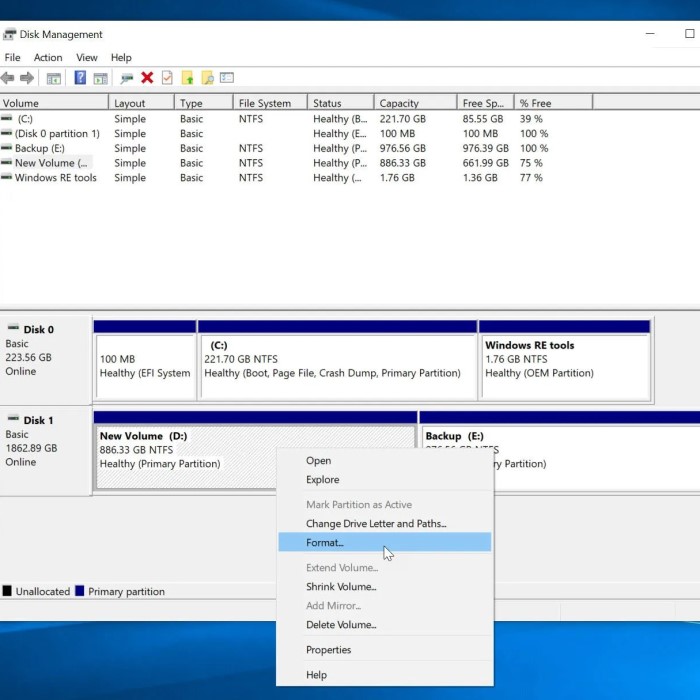
How to Completely Format a Hard Drive?
Completely formatting a hard drive typically involves using disk management tools in your operating system that allow you to choose “Format.” For a thorough wipe, consider using advanced data-wiping software that performs multiple overwrite passes.

Conclusion: Achieving Total Data Privacy
In conclusion, understanding how to wipe a hard drive is essential for anyone conscious of their digital privacy. Whether you are preparing to sell, donate, or dispose of your hardware, securely erasing data is a crucial step.
By using the methods outlined in this guide, including built-in operating system features, third-party software, or physical destruction, you can ensure that your personal information remains secure. Remember that deleting files or formatting a drive is insufficient; a thorough wipe guarantees that your sensitive data is permanently erased.
Take time to understand each method and prioritize your data privacy. With this knowledge, you can confidently manage your data and ensure your personal information is protected in an increasingly connected world. The right approach to cleaning your hard drive not only enhances security but also ensures that your next device operates smoothly with complete peace of mind.