What Does It Mean to Unpartition a Hard Drive?
How to unpartition a hard drive? Unpartitioning a hard drive involves combining separate partitions into one. Partitions divide a drive into independent sections. Each partition can store different files, systems, or data. When you unpartition, you merge these partitions back into a single unit.
This process removes the logical separation within the drive. It returns it to its original state as one continuous storage space. For example, a single C: drive instead of multiple drives like C: and D:.
Unpartitioning is useful for simplifying storage management. It also allows you to utilize the entire storage capacity as one. However, it will delete all data on the partitions being merged. Always back up your data before starting this process.
Different operating systems provide tools to perform this task. You can use built-in utilities or third-party software depending on your needs.
Reasons to Unpartition a Hard Drive
Unpartitioning a hard drive can provide several advantages depending on your needs. Here are some common reasons why you might consider this step:
1. Simplified Storage Management
Merging partitions streamlines your file organization. Instead of managing multiple partitions like C: and D:, you work with a single continuous drive. This makes locating and organizing files simpler.
2. Maximizing Storage Usage
Partitions can restrict the use of available storage. Unpartitioning combines all space into one. This ensures no storage goes unused due to size limitations on individual partitions.
3. Repurposing Your Drive
Changing how you use your hard drive often requires unpartitioning. For example, if a drive previously split for dual operating systems is no longer needed, merging it can simplify its usage.
4. Preparing for New Installations
Unpartitioning is often necessary before installing new operating systems. A single large partition is preferred for fresh installations, and it ensures better compatibility.
5. Resolving Partition Problems
Corruption or errors in a partition can affect usability. Combining partitions can resolve these issues, restoring the drive to a functional state.
6. Enhancing Performance
In some cases, having multiple partitions can lead to slower performance. Unpartitioning reduces fragmentation and allows the drive to operate more efficiently.
Before proceeding with unpartitioning, ensure it aligns with your specific storage needs. Always consider the potential impacts, such as data loss, and take necessary precautions like creating backups.
Precautions Before Unpartitioning Your Hard Drive
How to unpartition a hard drive? Unpartitioning a hard drive can remove existing data permanently. It is essential to prepare before starting. Consider these precautions to avoid issues:
1. Back Up Your Data
Always create backups of critical files. Store them on an external drive or cloud storage. This ensures data safety and easy recovery after the process.
2. Verify Partition Details
Check the partitions you plan to merge. Confirm their sizes and contents. This helps you avoid mistakes during unpartitioning.
3. Ensure Drive Has Enough Space
Ensure enough free space is available for the merge. Lack of space can interrupt the process.
4. Double-Check Operating System Compatibility
Verify the tools you plan to use are compatible with your OS. Not all methods work for every system.
5. Ensure Stable Power Supply
Unpartitioning takes time. Ensure your computer won’t shut down during the process due to power issues. For laptops, connect the charger.
6. Understand the Risk of Data Loss
Be aware that all data within partitions will be erased. Make sure you’ve accounted for this.
7. Disconnect Extra Storage Devices
Remove any external drives to prevent accidental erasure. This ensures you work only on the intended hard drive.
Taking these precautions ensures a smoother and safer unpartitioning process. Planning ahead minimizes risks and protects your data.
Methods to Unpartition a Hard Drive
How to unpartition a hard drive? Unpartitioning a hard drive can be done using different methods. Your choice depends on your operating system and specific preferences. Here are two common approaches:
Using Built-in Disk Management Tools (Windows/Mac)
Many operating systems include built-in tools for managing partitions, which you can use to unpartition a hard drive. Here’s how:

On Windows:
- Access Disk Management: Right-click the Start button. Select “Disk Management” from the menu.
- Select Your Drive: Click the partition you want to unpartition.
- Delete Partition: Right-click and select “Delete Volume.” Confirm the deletion.
- Merge Space: Right-click the unallocated space. Choose “Extend Volume” to combine it.
On macOS:
- Open Disk Utility: Go to “Applications,” then “Utilities,” and select “Disk Utility.”
- Select Your Drive: Click the drive containing the partitions.
- Erase a Partition: Choose each partition, click “Erase,” and confirm.
- Combine Space: Click the main drive and resize to merge the erased partitions.
Built-in tools are convenient and free, but may have limited functionality compared to third-party software.
Employing Third-Party Software
Third-party software provides advanced features for managing partitions. This option is ideal if built-in tools don’t meet your needs. Examples include EaseUS Partition Master, MiniTool Partition Wizard, and Paragon Partition Manager.
Benefits of Third-Party Software:
- User-Friendly Interfaces: Easy-to-use graphical interfaces make the process straightforward.
- Advanced Features: Offer better control over partitions, such as cloning and aligning data.
- Compatibility: Most software supports multiple file systems and operating systems.
General Steps for Using Third-Party Software:
Install the Software
- Download the Partition Manager: Begin by visiting the official website of your chosen partition manager software. Look for a reliable source to ensure you download the correct version.
- Choose Your Version: Depending on your operating system, select the appropriate version (Windows, macOS, etc.) to avoid any compatibility issues.
- Run the Installer: After the download is complete, find the installation file in your downloads folder. Double-click it to run the installer and follow the on-screen instructions to complete the installation process.
- Launch the Software: Once installed, open the partition manager software. You may need to grant administrator permissions if prompted to allow the program to access your disk drives.
Select Partition
- Navigate to the Main Interface: After launching the software, you will see the main interface displaying your hard drive and its partitions.
- Identify the Target Partitions: Review the list of partitions visible in the software. Identify the specific partitions you wish to merge or delete based on your storage needs.
- Highlight the Partitions: Click on the partition you want to merge or delete. Some software may allow you to select multiple partitions simultaneously if necessary.
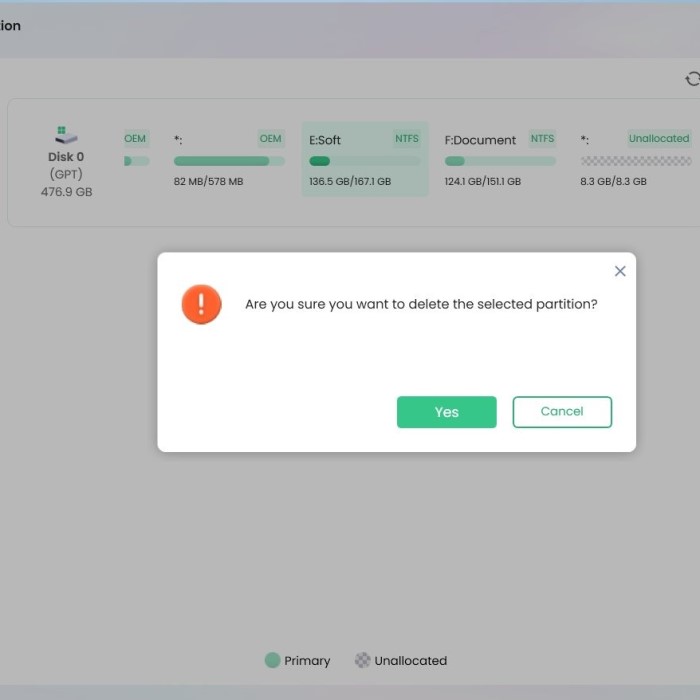
Delete Partitions
- Access the Delete Option: Right-click on the selected partition(s). This action usually opens a context menu containing various options.
- Choose “Delete” or “Remove”: From the context menu, select either the “Delete” or “Remove” option. The terminology may vary based on the software you are using.
- Acknowledge Prompts: Be aware that deleting a partition will erase all data on it. You may be prompted to confirm your choice—ensure you have backed up any necessary data before proceeding.
Merge Space
- Select Merging Option: After deleting the desired partitions, find the option labeled “Merge” or “Extend Volume” in the software’s main interface. This option is typically visible in the toolbar or context menu.
- Choose Adjacent Unallocated Space: Make sure to select the unallocated space you want to merge with an existing partition. The software will usually guide you through the selection process.
- Review and Confirm Merging Strategy: Depending on the software, you may have multiple merging strategies available. Choose the one that best suits your needs, whether it means merging directly or extending volume safely.
Confirm Changes
- Review Your Selections: Before finalizing, take a moment to review the partitions selected for deletion and merging. Confirm that everything is as intended.
- Apply Changes: Click the “Apply” or “Execute” button to implement the changes. This action may initiate the merging process, which can take some time, depending on the amount of data and size of the partitions.
- Follow Any Follow-Up Prompts: If the software displays prompts during the process, read them carefully and respond accordingly. You may need to restart your computer for changes to take effect fully.
Using third-party software requires careful attention, as mistakes can lead to data loss. Always review changes before confirming.
Step-by-Step Guide: Unpartitioning a Hard Drive on Windows
Unpartitioning a hard drive on Windows involves combining multiple partitions into one. Follow these steps carefully to avoid errors and data loss:
Back Up Your Data
- Save critical files on external storage or cloud services.
- Confirm that your backup is complete and accessible.
Access Disk Management
- Right-click the Start Button and select “Disk Management.”
- Wait for Disk Management to load all your drives and partitions.
Select the Partition to Delete
- Identify the partitions you want to merge.
- Right-click the partition and select “Delete Volume.”
- Confirm the deletion. This action erases all data within the partition.
Repeat for Other Partitions
- Delete all other partitions that you want to merge.
- Ensure all merging partitions are now marked as “Unallocated Space.”
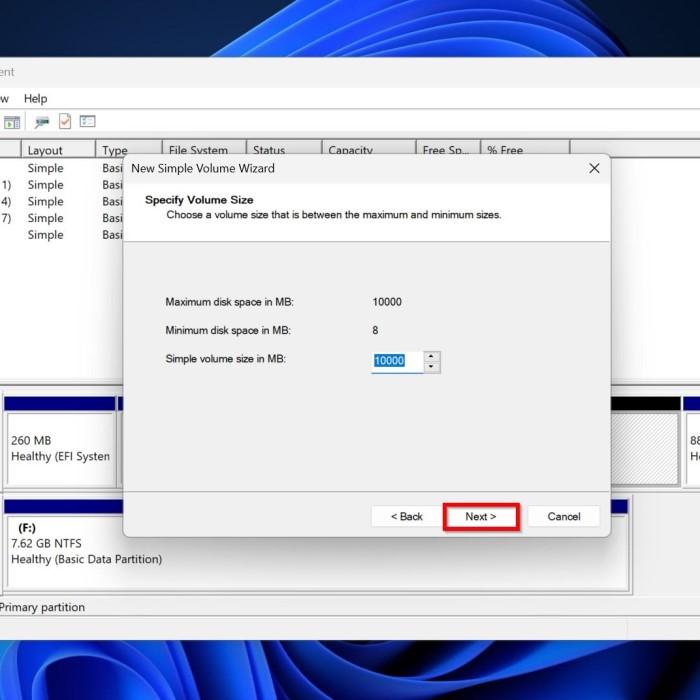
Merge Unallocated Space
- Right-click on the remaining partition or unallocated space.
- Choose “Extend Volume” from the menu.
- Follow the wizard to merge the unallocated space into a single partition.
Double-Check the Results
- Verify the drive now displays as one continuous partition.
- Open “This PC” to confirm increased capacity.
Additional Tips
- Ensure stable power during the process.
- Avoid deleting partitions unnecessarily to reduce risk of data loss.
This method uses Windows’ built-in tools, making it safe and cost-effective. However, always proceed with caution to protect your data.
Step-by-Step Guide: Unpartitioning a Hard Drive on macOS
Unpartitioning a hard drive on macOS is simple. Use the built-in Disk Utility tool for this process. Carefully follow the steps to ensure data safety.
Back Up Your Data
- Save important files to external storage or cloud.
- Verify backups are complete before continuing.
Access Disk Utility
- Open “Applications,” then “Utilities,” and select “Disk Utility.”
- Wait for the tool to load your drives.
Select the Drive Containing Partitions
- Click the drive that has partitions you want to unpartition.
- Verify partition details before proceeding.
Erase Partitions
- Select each partition you wish to delete.
- Click “Erase” and confirm to remove the partitions.
- This step deletes all data in the selected partitions.
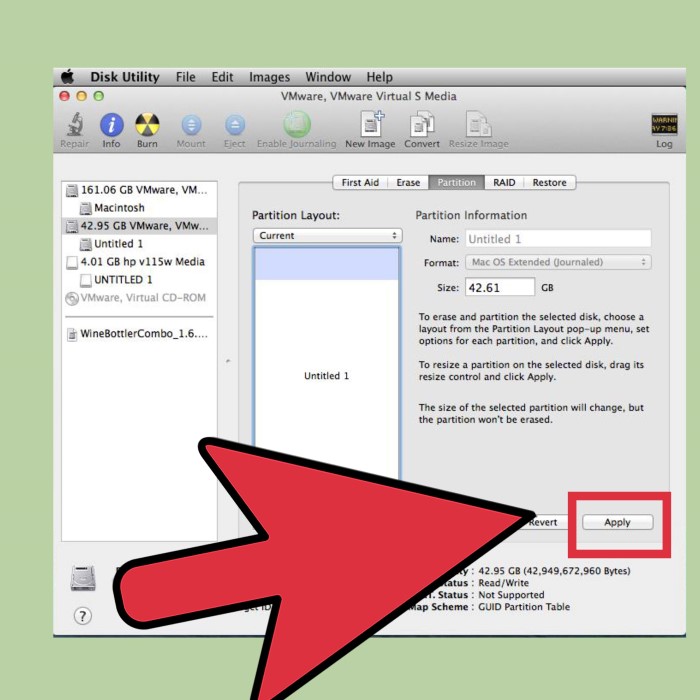
Combine Space
- Click on the main drive in Disk Utility.
- Resize the drive to merge previously erased partitions.
- Confirm changes by applying the actions.
Check Results
- Verify the drive now appears as one partition in Disk Utility.
- Open Finder and confirm that the storage space reflects the merged partitions.
Additional Tips
- Ensure a stable power supply during the process.
- Avoid erasing partitions unnecessarily to prevent data loss.
This method relies on macOS’s built-in tools, which are reliable and user-friendly. Always back up files beforehand to protect your data.
How to Recover Data After Unpartitioning
Unpartitioning a hard drive may result in the loss of all data on the affected partitions. If you accidentally lose critical data during this process, don’t panic. Data recovery is often possible with the right tools and methods. Below are the steps you can follow:
1. Stop Using the Hard Drive
- Avoid saving new data on the drive.
- This prevents overwriting the lost files, increasing recovery chances.
2. Use Data Recovery Software
- Download reliable software such as EaseUS Data Recovery or Recuva.
- Install it on a different drive to avoid overwriting data.
- Follow these steps:
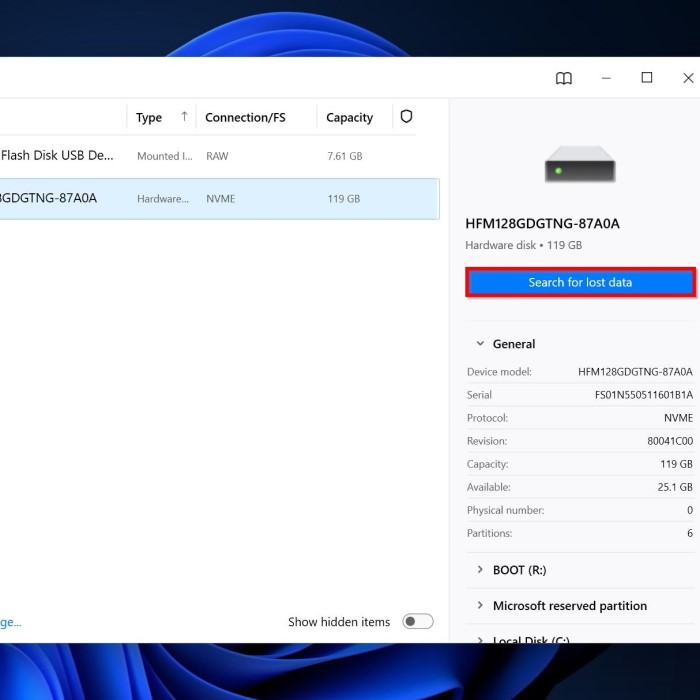
- Scan the Drive: Select the unpartitioned drive and start a deep scan.
- Locate Files: Look for your missing files in the scan results.
- Recover Data: Save recovered files to an external drive for safety.
3. Consider Professional Data Recovery Services
- If software cannot recover your data, consult a professional recovery expert.
- They use advanced tools to retrieve inaccessible files.
4. Perform Regular Backups in the Future
- Use external drives or cloud storage to back up important files.
- This reduces risks during partition changes or other processes.
By taking these steps, you can recover important data after unpartitioning and prevent future issues. Always exercise caution and plan ahead.
Common Issues and Troubleshooting Tips
Unpartitioning a hard drive, while straightforward, can sometimes lead to unexpected issues. Here are common problems you might encounter and tips to resolve them:
1. Unable to Delete Partition
- Problem: The system blocks you from deleting a partition.
- Solution:
- Check if the partition is being used by the system.
- For system partitions, you may need to use bootable tools or third-party software.
- In Windows, ensure you’re logged in as an administrator.
2. Partition Not Showing as Unallocated
- Problem: Deleted partitions don’t appear as unallocated space.
- Solution:
- Refresh the Disk Management view or restart your computer.
- Use third-party partition management software if the problem persists.
3. Disk Management Wizard Fails to Extend Volume
- Problem: You cannot merge unallocated space using the “Extend Volume” option.
- Solution:
- Ensure the unallocated space is directly next to the partition you want to extend.
- If not adjacent, adjust the partition layout with third-party tools.
4. System Becomes Unresponsive
- Problem: The system freezes or crashes during the process.
- Solution:
- Ensure adequate power and do not force shut down your system.
- Restart after a freeze and attempt the process again.
- Use more stable software tools if your system utility fails.
5. Data Loss After Unpartitioning
- Problem: You lose important files during the process.
- Solution:
- Immediately stop using the drive to avoid overwriting deleted data.
- Use reliable data recovery software like EaseUS or Recuva.
- Consult professionals if you cannot retrieve files independently.
6. Compatibility Issues with Software Tools
- Problem: Your operating system doesn’t support the software or tools.
- Solution:
- Update your OS to the latest version.
- Research and choose tools that are compatible with your specific OS version.
7. Partition Table Errors
- Problem: Errors occur in the partition table after the process.
- Solution:
- Use disk-checking tools like CHKDSK on Windows or Disk Utility on macOS.
- For severe issues, recreate the partition table using advanced utilities.
Additional Tips:
- Always back up your data before making any changes.
- Disconnect unnecessary drives to avoid accidental changes.
- Use well-documented guides and trusted software during the process.
Being aware of these issues and their solutions ensures a smoother unpartitioning process. Plan ahead to minimize risks.
Conclusion: Mastering Hard Drive Management
In conclusion, learning how to unpartition a hard drive can significantly improve your digital organization and efficiency. Whether you utilize built-in tools or third-party software, the process is straightforward if you follow the necessary steps. Remember to adequately prepare before unpartitioning, and implement regular maintenance to keep your hard drive functioning optimally. With the right approach, you can unlock storage and enhance your computer’s performance, ensuring a smoother user experience.