Introduction to Ejecting External Hard Drives in Windows 11
Using an external hard drive with your Windows 11 computer can significantly enhance your storage capacity. However, knowing how to eject external hard drive Windows 11 safely is crucial to prevent data loss or corruption. In this article, we will explore all necessary steps, best practices, and troubleshooting tips to ensure you have a seamless experience when managing your external storage.
Why It’s Important to Safely Eject External Drives
Risks of Improperly Removing External Drives
Removing an external drive without safely ejecting it can harm your data and device. Improper removal may corrupt files on the drive, making them unreadable. Your external hard drive or USB device might also sustain physical damage. Some processes might still access the drive when you unplug it. This can lead to errors and damage to the drive’s internal mechanisms. Repeatedly ignoring safe ejection may shorten the lifespan of your device.
How Safe Ejection Protects Your Data
Safe ejection ensures that Windows 11 completes all read and write operations. It prevents data loss by ensuring no files are left open during removal. The system also disconnects any active connections to the drive. Safe ejection reduces the risk of file corruption and drive damage. It helps preserve your data’s integrity and keeps your external drive in good condition. Following the proper ejection steps ensures a reliable performance from your device.
Preparing to Eject an External Drive in Windows 11
How to eject external hard drive windows 11? Preparing to eject an external drive ensures data safety and prevents device damage. Before ejecting, check for any open files or active processes.
Checking for Open Files or Active Processes
Always confirm no files are open on the external drive. Open files can cause data corruption if ejected improperly. Use File Explorer to identify ongoing file activities. Close all applications accessing the drive before proceeding. For thorough checking, verify running processes using Task Manager. Ensure that software like backup tools or antivirus programs isn’t actively using the drive.
Ensuring No Background Applications Are Using the Drive
Close all background apps interacting with your external drive. Background processes can lock the drive, leading to ejection errors. Check for file-syncing tools or media players using the drive. Disable auto-sync features temporarily if needed. Use Task Manager to identify and terminate unwanted applications if necessary. Verifying these steps avoids potential issues during ejection.
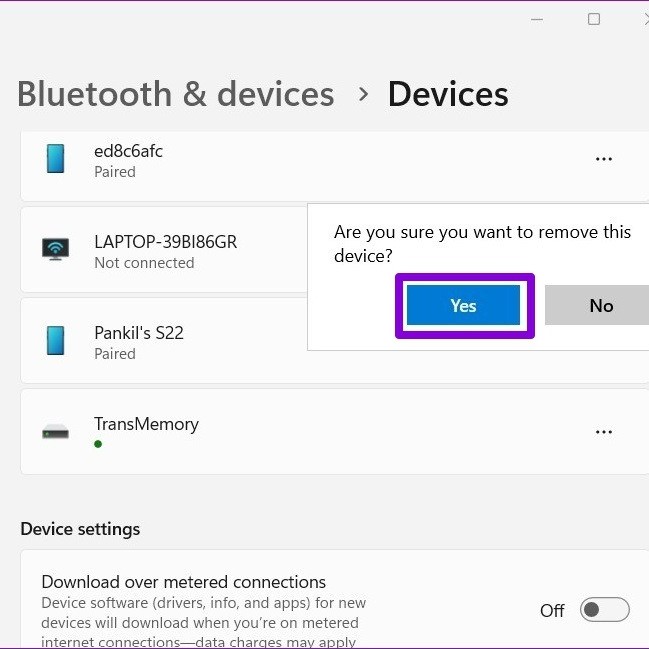
Methods to Eject External Drives in Windows 11
How to eject external hard drive windows 11? Safely ejecting external drives in Windows 11 prevents data loss and hardware damage. Here are three reliable methods you can use to safely disconnect your external hard drive or USB device from your system.
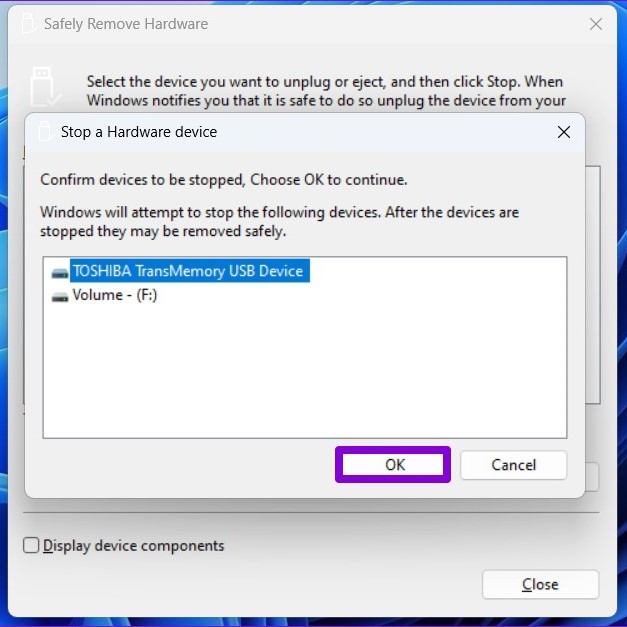
Using the Taskbar Icon to Safely Remove Drives
- Locate the “Safely Remove Hardware” icon on your taskbar. It usually appears near the clock.
- Click on the icon to see the list of connected external devices.
- Select the drive you want to eject.
- Wait for the notification indicating it is safe to remove the device.
- Physically disconnect the drive once the notification appears.
This method is quick and easy for most users. Ensure all file operations are complete before proceeding.
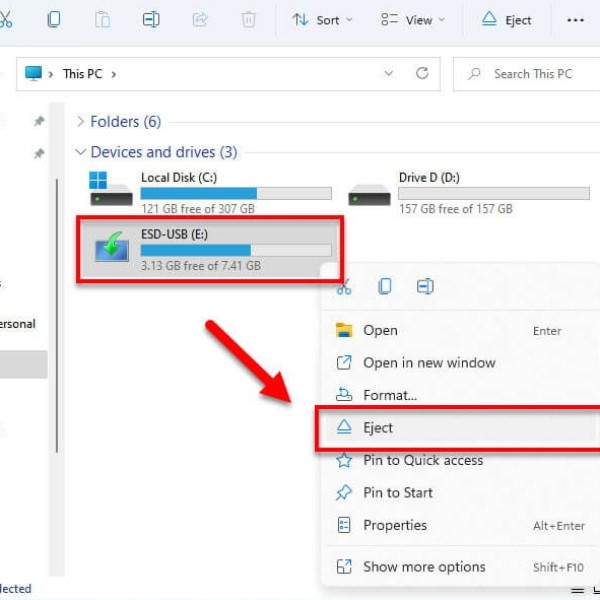
Ejecting Drives Via File Explorer
- Open File Explorer on your computer.
- Navigate to “This PC” or “Devices and Drives” to find your external drive.
- Right-click the drive and choose “Eject” from the menu.
- Wait for the system to confirm it is safe to remove the drive.
- Disconnect the device once the confirmation is displayed.
Using File Explorer ensures you eject your device directly through Windows without needing additional tools. Make sure all programs using the drive are closed before attempting to eject.
Using Device Manager to Safely Disconnect Drives
- Press “Windows + X” and choose “Device Manager” from the menu.
- Find your external drive under “Disk Drives.”
- Right-click the drive and select “Properties.”
- Go to the “Policies” tab and choose to disable write caching if necessary.
- Right-click the drive again and select “Disable Device.”
- Wait for the system to confirm the drive has been disabled.
- Remove the device physically from your computer.
This method provides more control over the ejection process. It is useful for troubleshooting issues with safely disconnecting your drive.
By using these methods, you can safely eject external drives on Windows 11 while avoiding data corruption and prolonging the life of your hardware.
Troubleshooting Issues When Ejecting External Drives
When attempting to eject external drives in Windows 11, you may encounter errors or disruptions. These issues can prevent safe removal of your USB or external hard drive. Understanding and addressing these problems ensures data safety and smooth operation.
Common Errors When Attempting to Eject Drives
- “Drive in Use” Error: This message appears when an application is still accessing the drive. File transfers or background processes may be the cause.
- Access Denied: Sometimes, the system might block ejection due to locked files. This can happen with file-syncing tools or media players.
- Device Not Recognized: Occasionally, Windows 11 may fail to detect the external drive or its status properly.
- Write Cache Enabled Warning: This is related to settings in Windows that prioritize performance but make safe removal more complex.
- No Eject Option Visible: The “Eject” option might be missing from File Explorer or the taskbar.
Understanding these errors helps in diagnosing the root cause quickly. It’s crucial to take corrective steps to avoid data loss.
Steps to Resolve “Drive in Use” Notification
Close Active Windows
- Identify Open File Explorer Windows: Begin by checking your desktop and taskbar for any active File Explorer windows that might be displaying the contents of your external drive. These windows must be closed to safely eject the drive.
- Close Each Window: Click on each File Explorer window that shows the drive or its contents. Use the “X” button in the upper-right corner to close them. Alternatively, you can right-click on the windows in the taskbar and select “Close” to shut them down quickly.
- Verify Closure: After closing the windows, ensure that none are still running in the background. You can hover over the File Explorer icon on the taskbar to see if any windows remain open.
End Background Applications
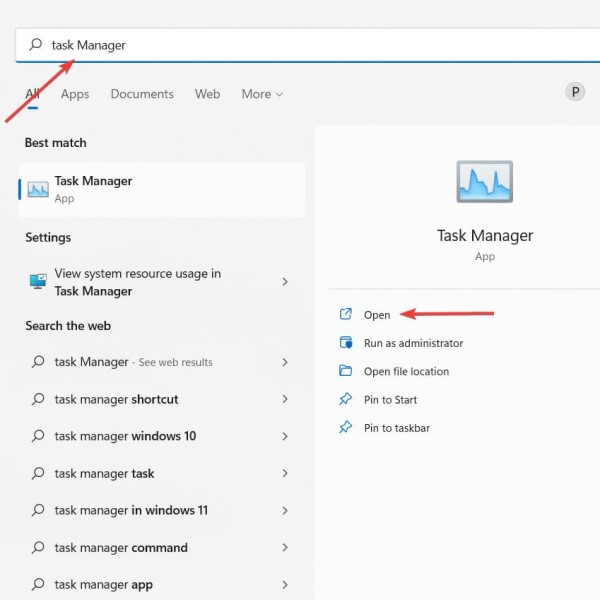
- Open Task Manager: To manage background applications using the external drive, press
Ctrl + Shift + Escsimultaneously. This will open the Task Manager. - Check Active Applications: Look for any applications listed under the “Processes” tab that might be utilizing the external drive. Common culprits may include applications for file syncing, media playback, or backup programs that automatically interact with external storage.
- End Unwanted Processes: Click on any applications that you identify as using the drive. Then, press the “End Task” button located in the bottom-right corner. Make sure to close file-sync tools or media players that might access the drive.
Wait for Ongoing Processes to Finish
- Identify Ongoing Transfers: If you are currently transferring files or running backups, check the progress. These operations may still be using the drive and can prevent safe ejection.
- Allow Processes to Complete: It is important to allow these ongoing processes to finish entirely. Cancelling them prematurely could corrupt data or cause issues with the external drive.
- Monitor Progress: Keep an eye on the file transfer or backup window. Once it indicates that the process is complete, proceed to the next steps for safe ejection.
Disable File Caching Temporarily
- Access Device Manager: Right-click on the Start button, and select “Device Manager” from the context menu. This will open a list of all connected devices.
- Locate Your Drive: In Device Manager, find the section labeled “Disk drives.” Click to expand this section and identify your external drive from the list.
- Modify Drive Properties: Right-click on the external drive, and select “Properties.” Navigate to the “Policies” tab in the properties window.
- Disable Write Caching: Within the Policies tab, look for the checkbox that says “Enable write caching on the device.” Uncheck this option to temporarily disable write caching. Click “OK” to apply the changes.
Restart Windows Explorer
- Open Task Manager Again: If you have previously closed the Task Manager, reopen it by pressing
Ctrl + Shift + Esc. - Find Windows Explorer: Scroll through the list of running processes until you see “Windows Explorer.” This may be found under the “Processes” tab.
- Restart the Process: To restart Windows Explorer, click on it to highlight it, then right-click and select “Restart.” This action will refresh the interface and ensure that any lingering connections to the drive are terminated.
Use Taskbar or File Explorer Ejection
- Select the Ejection Method: After completing the previous steps, you can now try to eject the external hard drive. You have two options: using the Taskbar icon or File Explorer.
- Using the Taskbar Icon: Look for the USB icon in the bottom-right corner of your taskbar. Click on it to get a list of connected devices. Select your external hard drive and click “Eject.”
- Using File Explorer: Alternatively, open File Explorer, find your external drive listed under “This PC,” and right-click on it. Choose “Eject” from the context menu.
Shutdown Option
- Consider Shutdown as a Last Resort: If you have followed all previous steps and still cannot eject the drive, shutting down your computer may be the final solution to safely disconnect the hardware.
- Shutdown Procedures: Click on the Start menu and select the power icon. From the options, choose “Shut down.” Confirm the shutdown if prompted.
- Disconnect the Drive: Once your PC has completely turned off, you can safely disconnect the external hard drive from the USB port. This ensures that no file processes are running, and the drive is safe to remove.
Following these steps resolves common ejection issues and ensures your data remains intact. Handling errors correctly minimizes the risk of long-term hardware damage or file corruption.
Best Practices for Managing External Drives
Formatting and Labeling Drives for Easy Identification
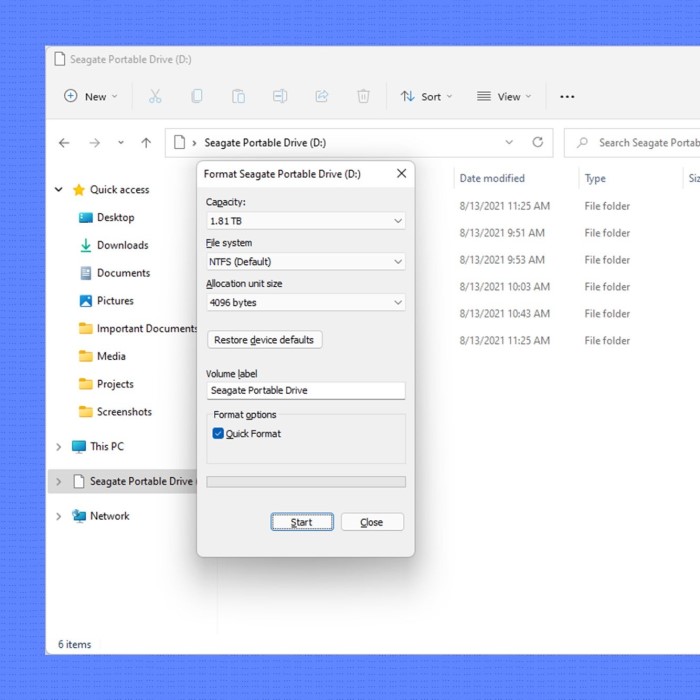
Formatting external drives ensures compatibility with your operating system. Choose a file system suited for your needs. For example, NTFS works well for Windows-only use, while exFAT supports both Windows and macOS. Formatting also removes unnecessary files and improves performance.
Labeling external drives prevents confusion when using multiple devices. Assign descriptive names, such as “Work Files” or “Backup Drive.” Use labels that clearly identify the drive’s purpose. These small steps make it easier to organize and locate your data quickly.
Regularly Backing Up Data on External Drives
External drives are not immune to failures or accidental damage. Regular backups protect your data. Schedule backups weekly or after making significant changes to files. Use backup tools provided by Windows 11 or third-party applications.
Keep multiple copies of important data. Store backups on different devices, such as cloud storage or another drive. Verify your backups occasionally to ensure files are accessible and not corrupted.
By following these practices, you can maintain well-organized and secure external drives while reducing the risk of data loss.
FAQs About Ejecting External Drives
Can I Remove a Drive Without Ejecting It?
Removing a drive without ejecting it can cause data loss or corruption. The system might still be accessing the drive for read/write operations. If files are open or processes are running, improper removal can damage them. Always use proper ejection methods like the Taskbar icon, File Explorer, or Device Manager. These ensure all processes have finished before you remove the drive.
What Happens If I Forcefully Remove a Drive?
Forcefully removing a drive can lead to several issues. Data may get corrupted, or files might become inaccessible. The drive’s system can also suffer wear, reducing its lifespan. Active tasks like file transfers or backups can fail, hurting saved data. To avoid risks, always safely eject the drive following recommended steps in Windows 11.
Conclusion: Ensuring Safe Removal of External Drives
In summary, knowing how to eject external hard drive Windows 11 is essential for protecting your important data and device integrity. Following the proper steps, such as closing all programs and utilizing the USB icon in the taskbar, ensures a smooth and secure ejection process.
Remember, regularly practicing safe ejection reduces the risk of data loss and corruption. By implementing best practices, you can enjoy the benefits of external storage without the hassle of potential issues.
In today’s digital age, where data management is critical, taking the time to eject drives properly is a simple yet effective way to safeguard your electronic files. Embrace these steps and enjoy a more reliable experience with your external hard drives!