When you connect an external hard drive to your Mac, you usually expect it to show up immediately. However, sometimes, it may not appear in Finder or on your desktop. Knowing how to find external hard drive on Mac can save you a lot of time and frustration. This guide will walk you through the steps to locate your external hard drive, troubleshoot common issues, and optimize your external drive usage.
Understanding External Hard Drives on Mac
External hard drives are versatile storage devices used for backing up data, transferring files, or expanding your Mac’s storage capacity. They connect via USB, Thunderbolt, or other ports available on your Mac. While they usually work seamlessly with macOS, various factors can prevent them from appearing correctly. Understanding how your Mac interacts with these devices is essential for effective troubleshooting.
Common Reasons Why External Hard Drives Don’t Show Up on Mac
Hardware Issues
Hardware problems are a common cause when external drives fail to appear on a Mac. The drive itself may be damaged, preventing proper functioning and communication with your computer. Improper insertion into the port can also lead to recognition issues. Ensure the drive is compatible with your Mac’s hardware for seamless detection.
Format Incompatibility
External drives formatted for Windows or other operating systems may not appear on macOS. macOS requires compatible formats like APFS, HFS+, or exFAT to recognize connected drives. Drives formatted to NTFS often won’t show up unless third-party software is installed.
Faulty Cables or Ports
Damaged cables can disrupt the connection between your Mac and the external hard drive. Frayed wires or loose cable ends may prevent your Mac from identifying the drive. Similarly, malfunctioning USB or Thunderbolt ports can hinder your Mac’s ability to connect. Testing with alternate cables or ports can help diagnose and resolve the issue.
Initial Steps to Diagnose the Problem
How to find external hard drive on mac? When your external hard drive does not show up on your Mac, it’s important to start with basic diagnostic steps. These initial checks can help pinpoint the underlying issue.
Checking the External Hard Drive Connection
- Confirm the cable is securely connected to your Mac and the external drive.
- Check the USB or Thunderbolt port for any visible damage or debris.
- Try using a different cable to rule out cable-related problems.
- Connect the external drive to a different port on your Mac.
- Ensure your drive has power if it requires an external power source.
Testing the Drive on Another Device
- Connect the external hard drive to another computer to check for detection.
- If the drive works on another device, your Mac may have configuration issues.
- Use a Windows PC or another Mac for testing compatibility and functionality.
- A malfunctioning drive that doesn’t work elsewhere may require further repairs or replacement.
Restarting Your Mac
- Restart your Mac to refresh its system settings.
- Go to Apple menu > Restart and let the system reboot.
- After restarting, reconnect the external hard drive and check for detection.
- A simple restart often fixes many hardware and software recognition problems.
By following these steps, you can quickly narrow down common causes of the problem and decide on the next action.
Using Disk Utility to Locate the External Hard Drive
How to find external hard drive on mac? Disk Utility is a valuable tool for diagnosing and fixing external hard drive issues. It comes pre-installed on every Mac and can help locate and repair problematic drives. Here’s how you can use it to troubleshoot your external hard drive.
Accessing Disk Utility
- Open “Finder” and go to “Applications.”
- Navigate to the “Utilities” folder and click “Disk Utility.”
- Alternatively, use Spotlight by pressing Command + Space, then typing “Disk Utility.”
- Select “Disk Utility” from the search results to open the tool.
Checking for the Drive in the Sidebar
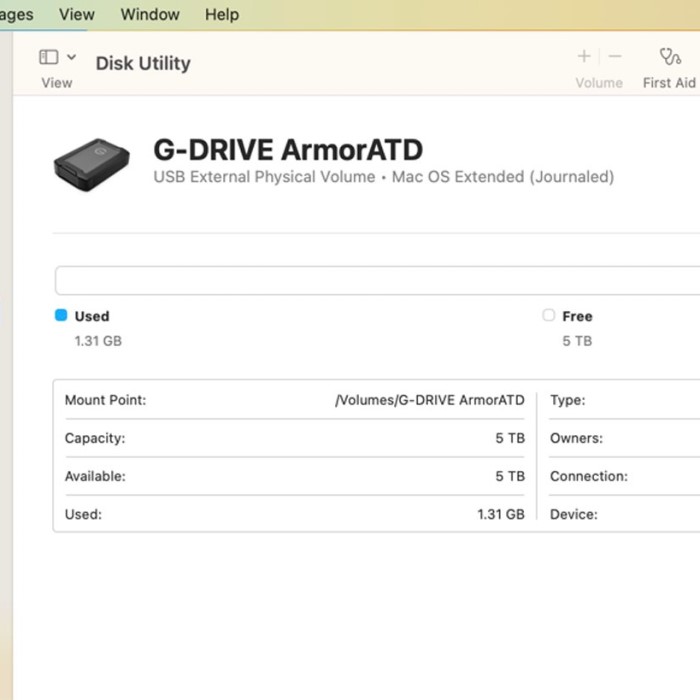
- In Disk Utility, check the left-side panel or sidebar.
- Look for your external hard drive under “External.”
- If it’s not visible, select “View” from the top menu.
- Click “Show All Devices” to display hidden disks.
- If the drive still doesn’t appear, verify the cable connection and try again.
Running First Aid to Repair Disk Errors
- Select your external hard drive in the sidebar.
- Click the “First Aid” button at the top of the window.
- Review the prompt and click “Run” to start the repair process.
- Wait for First Aid to complete and check the status message.
- If errors are repaired, eject and reconnect the drive to test it.
Using Disk Utility can resolve many disk-related problems effectively. It’s a quick way to identify whether the issue lies with your Mac or the external drive itself.
Ensuring Proper Drive Format Compatibility
External hard drives must use a macOS-compatible format to work seamlessly with your Mac. Format incompatibility can prevent the drive from showing up. Understanding the supported formats and reformatting, if necessary, are essential steps to resolve the issue.
Understanding macOS-Compatible Formats
macOS supports the following file system formats:
- APFS (Apple File System): Ideal for macOS users, offering speed and security.
- HFS+ (Mac OS Extended): Commonly used in older macOS versions.
- exFAT (Extended File Allocation Table): Best for transferring files between macOS and Windows systems.
Drives formatted using NTFS (a Windows default) are read-only on macOS without third-party software. Unrecognized formats won’t appear unless properly formatted.
How to Reformat an External Hard Drive for Mac
Follow these steps to reformat your drive:
- Back Up Your Data: Ensure all necessary data is copied elsewhere. Reformatting erases all data on the drive.
- Open Disk Utility: Navigate to Finder > Applications > Utilities > Disk Utility.
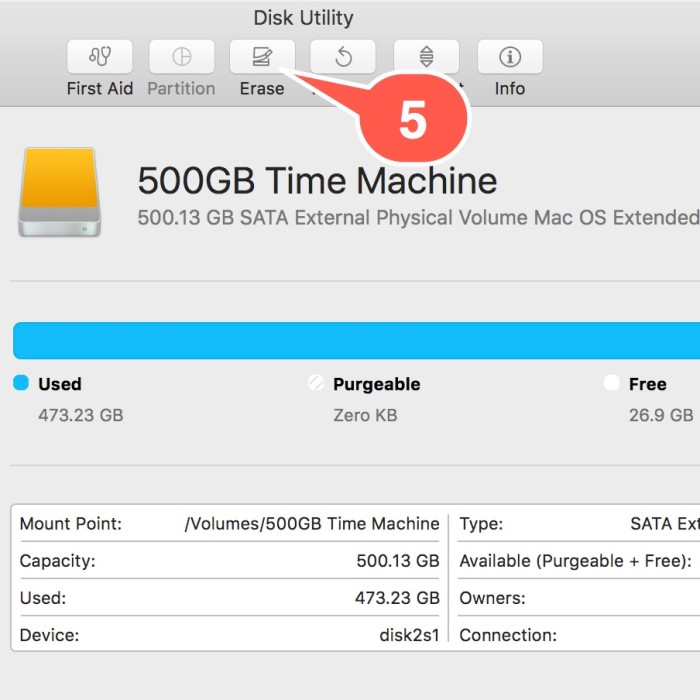
- Select Your Drive: In the sidebar, click on your external hard drive under “External.”
- Erase the Drive: Click the “Erase” button at the top of the window.
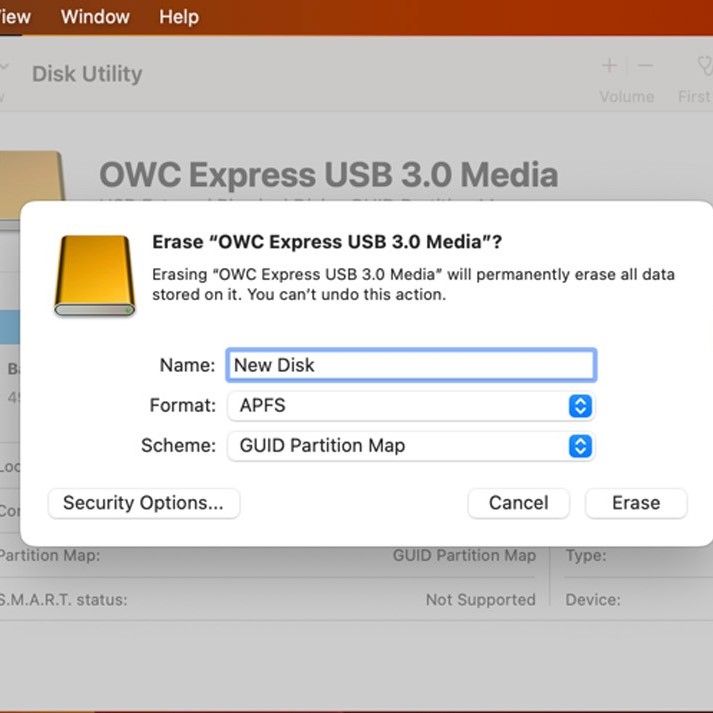
- Choose a name for your drive.
- Select a format: APFS, HFS+, or exFAT.
- Choose a scheme: “GUID Partition Map” for macOS compatibility.
- Click Erase: Wait for the process to complete. Once done, your drive is ready for use.
- Eject Safely: Always eject the drive before unplugging it.
Correct formatting ensures the drive integrates with macOS properly. Use the right file system based on your specific needs.
Adjusting Finder Settings to Display External Drives
One common reason external hard drives don’t appear on Mac is Finder settings. Incorrect settings can prevent the drive from showing up in Finder or on the desktop. Adjusting these settings helps ensure the drive is visible.
Enabling External Drives in Finder Preferences
- Open Finder on your Mac.
- Click on Finder in the top-left menu and select Preferences.
- In the Preferences window, go to the Sidebar tab.
- Look under the Locations section and ensure External Disks is checked.
- Now, navigate to the Finder sidebar and check if your external hard drive appears there.
Verifying Desktop Display Settings
- Open Finder Preferences again by selecting Finder > Preferences.
- Click on the General tab in the Preferences window.
- Under the “Show these items on the desktop” section, ensure External Disks is selected.
- Minimize Finder and check your desktop for the external hard drive icon.
By enabling these settings, your Mac will display external drives in Finder and on the desktop. Double-checking these preferences ensures your drive becomes easily accessible.
Checking System Preferences and Security Settings
To resolve issues with external hard drives on a Mac, check system preferences and security settings. These settings can impact device recognition, particularly for USB or Thunderbolt connections. Ensuring proper configurations can help make external hard drives visible.
Updating macOS to the Latest Version
- Open the Apple menu and select System Settings or System Preferences.
- Navigate to Software Update to check for available updates.
- If updates are found, click Update Now or Upgrade Now.
- Let your Mac install the latest version, then restart to complete the process.
- Reconnect the external hard drive and check if it shows up.
An outdated macOS version may cause compatibility problems. Updating ensures your Mac can detect and interact with external devices.
Granting Permissions for USB or Thunderbolt Devices
- Open System Settings or System Preferences from the Apple menu.
- Go to Privacy & Security and review settings under Accessibility or Full Disk Access.
- Look for apps or services managing USB or Thunderbolt devices and grant necessary permissions.
- Ensure external devices aren’t blocked under Firewall settings.
- Disconnect and reconnect your external hard drive after updating the permissions.
Sometimes macOS security features restrict access to external devices. Adjust these preferences to grant full access and fix recognition issues.
Advanced Troubleshooting Techniques
If your external hard drive still doesn’t appear on your Mac, advanced troubleshooting may help. These techniques address deeper system-level issues that might prevent your drive from showing up.
Resetting NVRAM and SMC
Resetting the NVRAM (Non-Volatile Random-Access Memory) and SMC (System Management Controller) can resolve hardware-related glitches. Follow these steps:
Steps to Reset NVRAM:
- Shut down your Mac completely.
- Turn it back on and immediately press Option + Command + P + R.
- Hold the keys for about 20 seconds.
- Release the keys when you hear a startup sound or see the Apple logo.
Steps to Reset SMC (For Macs with T2 Chip):
- Shut down your Mac.
- Press and hold the Power button for 10 seconds.
- Release the button and wait a few seconds.
- Turn your Mac back on.
Resetting these components often resolves unknown hardware or firmware errors that could block the drive’s detection.
Using Terminal to Mount the Drive
If Disk Utility doesn’t help, you can try using Terminal to manually mount the drive. Terminal provides advanced control over macOS operations.
Steps to Mount an External Drive:
- Open Terminal from Applications > Utilities.
- Type
diskutil listand press Enter to view connected drives. - Find your external hard drive in the list (e.g., Disk2 or Disk3).
- Type
diskutil mountDisk /dev/diskX, replacing “diskX” with your drive’s identifier. - Press Enter and check if the drive becomes visible in Finder.
This method can fix issues where the drive connects but doesn’t mount properly.
Checking for Driver or Firmware Updates
Outdated drivers or firmware can cause detection problems. Updating them can resolve compatibility issues.
Steps to Update Drivers or Firmware:
- Visit the manufacturer’s website for your external hard drive.
- Look for driver or firmware downloads under the “Support” section.
- Download and install the latest updates for macOS.
- Restart your Mac after installation.
- Reconnect the drive to test if it works.
Keeping your drive’s firmware updated ensures ongoing compatibility and performance with macOS.
By following these advanced troubleshooting techniques, you can fix persistent issues effectively. If the problem persists, consult a professional or consider replacing the drive.
Preventative Tips for Avoiding External Hard Drive Issues
Preventing external hard drive issues begins with proper usage and maintenance. Follow these tips to ensure reliable performance and avoid potential problems.
Proper Ejection of Drives
- Always eject external drives safely before disconnecting them from your Mac.
- Right-click the drive icon on the desktop and select “Eject.”
- Alternatively, drag the drive icon to the Trash icon in the dock.
- Wait for the “Safe to Remove” notification before unplugging the drive.
- Improper ejection increases the risk of data corruption and drive damage.
Using High-Quality Cables and Ports
- Use original or high-quality cables for a stable connection.
- Avoid cheap or poorly made cables that can malfunction over time.
- Regularly inspect cables for wear, fraying, or loose connections.
- Use USB-C or Thunderbolt connections for faster data transfer.
- Check your Mac’s ports for debris or damage to ensure proper functionality.
Regular Drive Maintenance and Backup
- Run disk maintenance tools, like Disk Utility, to check for and repair errors.
- Use the “First Aid” feature in Disk Utility to keep the drive in good health.
- Back up essential files regularly to avoid data loss.
- Store your drive in a safe place to prevent physical damage.
- Avoid exposing external drives to extreme temperatures or moisture.
By following these preventative tips, you can prolong the lifespan of your external hard drive. It can also help ensure that your data remains safe and accessible.
Conclusion
Knowing how to find external hard drive on Mac can significantly streamline your experience with external storage. By troubleshooting common problems and familiarizing yourself with tools like Finder and Disk Utility, you can quickly access your files. Remember to follow best practices for connection and management to ensure your external drives remain in top working condition. Don’t hesitate to seek professional help if issues persist, and always back up your data regularly to prevent loss.