Introduction: The Importance of Backing Up Your MacBook
Backing up your MacBook is crucial for ensuring the safety and integrity of your data. With files becoming increasingly important in our digital lives, knowing how to backup MacBook to external hard drive is a skill every user should master. An external hard drive provides an additional layer of security, protecting your data against device failures, accidental deletions, and other unforeseen circumstances. In this article, we will explore simple tips for backing up your MacBook to an external hard drive, ensuring your important files are always secure.
Why Backing Up Your MacBook is Essential
Safeguarding Your Data
Backing up ensures your important files are safe. Accidents, viruses, or hardware issues can corrupt data. A reliable backup provides peace of mind and quick recovery. Protecting sensitive documents, photos, and work files is crucial. Backup strategies safeguard your digital life effectively.
Preparing for System Failures
No system is immune to problems. Unexpected crashes or software malfunctions can happen anytime. A good backup plan can prevent data loss during these events. You can quickly restore your system and get back to work. Always stay prepared for the worst-case scenario.
Protecting Against Data Loss Scenarios
Data can be lost due to theft, damage, or accidental deletion. Backup solutions minimize the risk in such cases. By keeping a copy of your files, recovery becomes easier after unexpected issues. This protection is essential for both personal and professional data.
Different Methods to Backup Your MacBook
Using External Hard Drives
Backing up to an external hard drive is a popular and reliable method. It is cost-effective and easy to manage. With this method, you connect an external drive to your MacBook and transfer files. Ensure the external hard drive has enough storage space for a complete backup.
Tools like Apple’s Time Machine make this process even simpler. With Time Machine, you can create automatic backups to your external drive. This helps you restore files or even the entire system when needed. External hard drives are also portable, allowing you to keep backups safely stored away from your MacBook.

Utilizing Cloud Backup Services
Cloud services offer a convenient way to back up your MacBook. Platforms like iCloud, Google Drive, or Dropbox store files online securely. These services allow access to your files from any device with internet connectivity.
Cloud backups provide automatic syncing, ensuring new data is always saved. They are ideal for protecting data against physical damage to devices. However, you may need to pay for additional storage as free plans are limited. Ensure you use a strong password and enable two-factor authentication for enhanced cloud security.
Time Machine vs Manual Backups
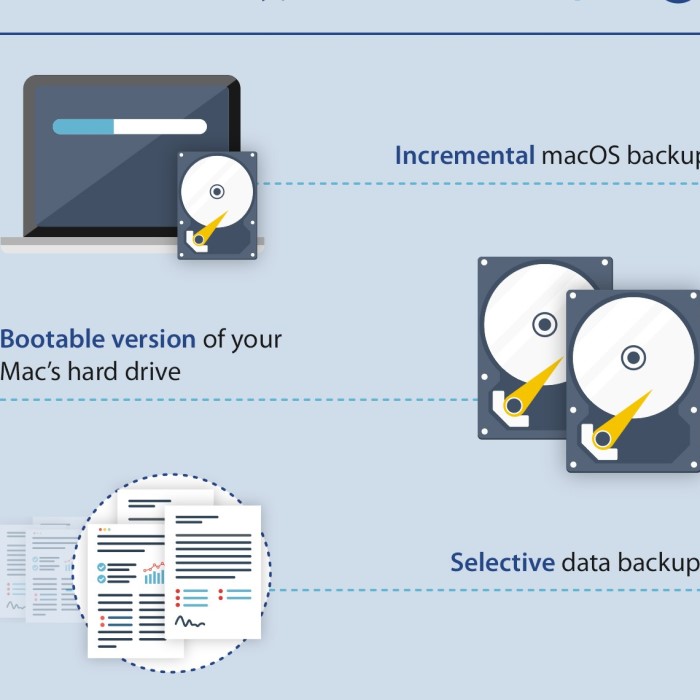
Time Machine is Apple’s built-in backup solution designed for ease of use and automation. With Time Machine, incremental backups are created, allowing you to restore files from specific dates. It integrates well with macOS and eliminates the need for manual file transfers.
Manual backups involve selecting and copying files to an external location yourself. This method gives more control over what gets backed up. However, it can be time-consuming compared to Time Machine. While Time Machine offers simplicity, manual backups provide flexibility for selective backups. Consider your needs before choosing between the two.
Preparing Your MacBook for Backup
Before starting the backup process, it’s essential to prepare your MacBook thoroughly. Proper preparation ensures a smooth and successful backup experience. Follow these steps to get your MacBook ready for backup:
Checking System Requirements
Verify that your MacBook runs on macOS compatible with your backup tools. Check for any software updates and install them. Updated systems ensure compatibility and better performance during backups. If using tools like Time Machine, confirm that your MacBook meets its requirements. This step minimizes compatibility issues.
Organizing Files for Backup Efficiency
Organize your files into easily identifiable folders. Prioritize essential documents, photos, and work files. Remove duplicates or files you no longer need. Proper organization reduces confusion and backup time. It also helps in quick recovery when needed. A clean and well-structured system is crucial for efficient backups.
Ensuring Enough Storage Space on Your External Drive
Ensure your external hard drive has sufficient space. It should hold your entire MacBook’s data. Check how much storage your MacBook is using. Compare it with the capacity of your external drive. Aim for a drive with at least twice the required storage. This leaves room for future backups. Insufficient space can lead to incomplete or failed backups.
How to Backup MacBook Using Time Machine
Setting Up Time Machine
Time Machine is Apple’s built-in backup solution. Start by opening “System Preferences” on your MacBook. Locate “Time Machine” and click on it. You will see an option to “Turn On” Time Machine. Click on it to enable the backup feature. Next, select the backup drive where your data will be stored. This ensures Time Machine knows where to save your files. After selecting a drive, Time Machine will automatically prepare it for use.
Connecting an External Hard Drive
To use Time Machine, you need an external hard drive. Connect your external hard drive to the MacBook using a USB or Thunderbolt cable. Make sure the hard drive has enough storage for your MacBook’s data. Once connected, your MacBook will detect the drive and ask if you want to use it for backups. Confirm and allow Time Machine to access the drive. Ensure the external hard drive remains connected during the backup process.
Configuring Time Machine Preferences
After connecting your external drive, modify Time Machine settings for optimal performance. Inside the Time Machine preferences, you can schedule automatic backups. Select the frequency of backups, ensuring new data is regularly saved. You can exclude specific files or folders if needed. This option helps you save storage space on the drive. Double-check all settings to ensure accuracy. Once configured, Time Machine starts creating backups automatically in the background. This makes future data recovery simple and fast.
Manually Backing Up Files to an External Hard Drive
How to backup macbook to external hard drive? Manually backing up your MacBook to an external hard drive gives you complete control over your data. This method is straightforward and allows you to selectively choose what files to save.
Selecting Files and Folders to Backup
Start by identifying important files and folders. Focus on personal documents, photos, videos, and work-related files. Create a checklist to ensure nothing is missed. Organize files into easily recognizable categories before transferring. This organization speeds up the backup process and simplifies future recovery.
Copying Data to the External Drive
Connect your external hard drive to the MacBook using a USB or Thunderbolt cable. Open Finder and navigate to the files you want to backup. Drag and drop the files into the external drive folder. Ensure the external drive has adequate space to store all selected files. Avoid unplugging the hard drive during the transfer process.
Verifying Transfer Success
Once the transfer is complete, double-check the external hard drive. Open the folders to confirm the files were copied successfully. Compare the files on the external drive to the originals on your MacBook. If everything matches, your backup is complete. Ensure the external drive is properly disconnected to prevent file corruption during removal.
Troubleshooting Common Backup Issues
How to backup macbook to external hard drive? Backing up your MacBook is essential, but sometimes issues can disrupt the process. Here are common problems and effective solutions to ensure a smooth backup experience.
External Drive Not Recognized
One common backup issue is when the external hard drive isn’t recognized by your MacBook. This problem can occur due to hardware or software faults.
- Check Cable Connections: Verify that the USB or Thunderbolt cable is securely attached to the MacBook and the external drive.
- Power Supply to External Drive: If your drive has external power, ensure it’s switched on properly.
- Restart Your MacBook: Restarting the system can resolve recognition issues.
- Update macOS and Drivers: Ensure your macOS is up-to-date and check for compatible drive software or firmware.
- Try Another Port: Use a different USB or Thunderbolt port to rule out port-specific issues.
If the drive remains undetected, use Disk Utility to see if the MacBook can identify the device.
Backup Process Failing
The backup process may fail due to compatibility issues, insufficient space, or corrupted backup tools. Here’s how to troubleshoot:
Verify Storage Space
- Assess Disk Capacity: Before starting your backup, check the total storage capacity of your external hard drive. You can do this by right-clicking the drive icon on your desktop and selecting “Get Info.”
- Check Available Space: Make sure there is enough free space available to accommodate the size of the data you plan to back up. Ideally, you should have at least 20% of the total capacity free to allow for future backups.
- Plan for Growth: Consider your future data storage needs. If you anticipate adding large files regularly, you may want to invest in a larger external hard drive.
Run a System Check
- Update macOS: Regularly check for updates to your operating system. Click the Apple menu, go to “System Preferences,” and select “Software Update” to see if there are any available updates.
- Install Recommended Patches: If any updates or patches are recommended, install them promptly. This ensures your MacBook is running the latest software, minimizing the potential for software conflicts during the backup process.
- Check Compatibility: Verify that your backup software (like Time Machine) is compatible with the latest macOS version to avoid issues.
Reconnect External Drive
- Safely Eject the Drive: Before disconnecting the external hard drive, safely eject it to prevent data corruption. You can do this by right-clicking the drive icon and selecting “Eject.”
- Reconnect the Drive: After safely ejecting, unplug the drive from your MacBook and plug it back in. This refreshes the connection and can help resolve any communication issues.
- Verify Connection: Ensure the external hard drive appears on your desktop and is accessible before proceeding with the backup.
Exclude Large Files
- Identify Large Files: Go through your files and identify any large files or folders that you do not need to back up. These could include videos or backups from other applications.
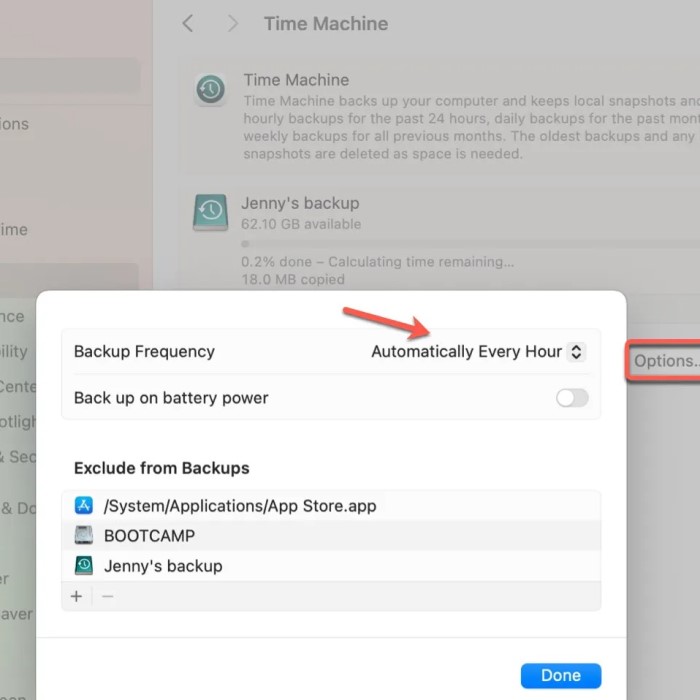
- Adjust Time Machine Preferences: To exclude files in Time Machine, go to “System Preferences,” select “Time Machine,” and then click on “Options.” Here, you can add files and folders that you wish to exclude from the backup.
- Manual Selection: If you’re manually handling backups, simply make a note of the files you wish to exclude when copying data to the external drive. This selective process will make the backup faster and more efficient.
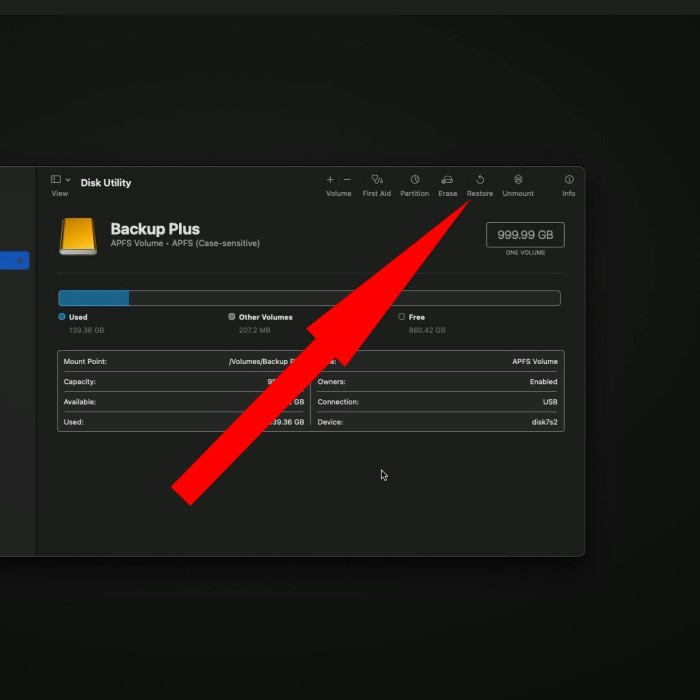
Verify Disk Integrity
- Open Disk Utility: Access Disk Utility through your Applications folder under Utilities. This built-in tool helps manage your disks and check their health.
- Select Your External Drive: In Disk Utility, select your external hard drive from the list of available drives. This allows you to run diagnostics and repairs specific to that disk.
- Run First Aid: Click the “First Aid” button to check the drive for errors. Disk Utility will scan for any issues and attempt to repair them automatically.
- Monitor for Issues: Regularly running this check can help you catch potential problems early before they lead to data loss.
Persistent failures may require formatting the external drive or switching to another backup method.
Restoring Data from Backups
If you encounter issues while trying to restore files after a backup, follow these fixes:
- Ensure Correct Backup Source: Confirm you’ve selected the right external drive or cloud service for restoration.
- Check Backup Settings: Ensure restoration is from the latest backup session.
- Use Time Machine Properly: Navigate through Time Machine’s interface to locate and restore files easily.
- Manually Restore: If automatic restoration fails, manually copy files to your MacBook from the backup.
- Test Restored Files: Open the recovered files to confirm their integrity and usability.
Troubleshooting issues effectively ensures your data remains safe and accessible whether using Time Machine or manual backups.
Best Practices for MacBook Backups
How to backup macbook to external hard drive? Backing up your MacBook is essential for protecting your data and ensuring quick recovery. To maximize the effectiveness of your backups, follow these best practices.
Scheduling Regular Backups
Frequent backups reduce the risk of data loss. Set a specific schedule for backing up your files. Time Machine allows automatic weekly or daily backups. For manual backups, create a reminder or calendar entry for consistency. Regular backups ensure you capture recent changes and additions to your data.
Keeping Multiple Backup Copies
Relying on a single copy can be risky. Use multiple storage options to secure your data. For example:
- Store one backup on an external hard drive.
- Use cloud services for a second backup.
- Keep an additional copy on a portable device for emergencies.
This strategy ensures protection against theft, damage, or corruption of one backup.
Encrypting Your Backup Data
Encrypting backups protects sensitive information from unauthorized access. Enable encryption when using Time Machine or cloud services. Use strong passwords and update them regularly. Encryption secures your data even if your storage device is lost or seized. Always prioritize security for both personal and professional files.
Restoring Data from Your Backups
Restoring data is vital after accidental loss or system failure. A reliable backup simplifies this process.
Using Time Machine to Restore Files
Time Machine makes file recovery efficient. Open “System Preferences” and select “Time Machine.” Connect the backup drive to your MacBook. Access the Time Machine timeline to see available backups. Browse for the specific date of the desired file version. Once located, click “Restore” to bring the file back to your MacBook. Ensure the file opens correctly after restoration to verify its integrity.
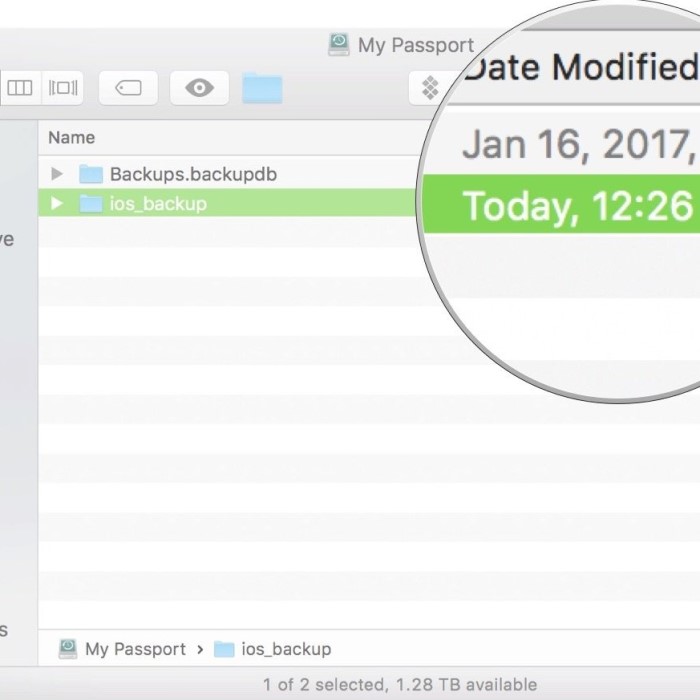
Recovering Data from Manual Backups
Manual backups allow selective restoration. Connect your external hard drive to the MacBook. Open Finder and navigate to the drive. Locate the specific folder or file you need from the backup. Copy these items back to your MacBook’s storage. Paste them into the appropriate directories. Check the files after the process to confirm successful recovery. Manual methods provide flexibility but require more effort.
Precautions to Minimize Data Loss During Recovery
Use the correct backup version to avoid restoring outdated files. Verify backups before beginning the recovery process. Keep the backup drive connected until restoration is complete. Avoid overwriting files unless necessary to ensure data integrity. Try restoring to a separate location if errors occur. These precautions ensure smooth and secure data recovery.
Conclusion: Protect Your Data with Easy Backups
In conclusion, understanding how to backup MacBook to external hard drive is essential for all users who wish to protect their precious data. Using Time Machine simplifies the backup process while providing a reliable solution. Additionally, manual methods give you flexibility.
By regularly backing up your data, you can safeguard against loss due to hardware failure or accidental deletions. Implementing these simple tips can help you stay organized and secure. Start your backup routine today and enjoy peace of mind knowing your data is safe! With the right practices, you can manage your data effectively and keep your MacBook running smoothly.