Initializing a hard drive is a crucial step for anyone looking to use a new storage device efficiently. For new users, especially in 2025, the process may seem overwhelming due to various options and configurations available. However, with proper guidance, it becomes a straightforward task. This article outlines the steps on how to initialize a hard drive, explains the difference between MBR and GPT, provides troubleshooting tips, and addresses common questions that may arise during the initialization process.
Understanding Hard Drive Initialization
Initialization is the process of preparing a new hard drive for use. It involves formatting the drive and setting up a partition style, which organizes how data is stored and retrieved. When you buy a new hard drive, it often appears as ‘unallocated’ in Disk Management until you initialize it. Initialization essentially involves configuring the drive so that the operating system can recognize and use it effectively.
Without proper initialization, a hard drive remains unusable, resulting in frustration for users. It is worth noting that improper configuration can lead to data loss or inefficiencies. Therefore, understanding how to initialize a hard drive is key to using it to its full potential.
Choosing Between MBR and GPT
Importance of Drive Initialization
- When preparing to initialize a new drive, one of the most critical decisions you’ll face is whether to choose MBR (Master Boot Record) or GPT (GUID Partition Table).
- This choice can significantly affect how your system interacts with the drive, its storage capabilities, and overall performance. Therefore, understanding the implications of each option is essential before proceeding.
Overview of MBR
- Definition and History: MBR is the traditional partition style that has been in use since the early days of personal computing.
- Limitations: One of the significant drawbacks of MBR is its size limitation. MBR can only handle drives up to 2TB, which can be a significant constraint as modern hard drives often exceed this capacity.
- Partition Support: MBR supports a maximum of four primary partitions or three primary partitions plus one extended partition, which can contain multiple logical partitions. This limitation makes it less versatile in managing complex storage configurations.
- Legacy Compatibility: On the positive side, MBR is compatible with older operating systems, including Windows XP and earlier versions of Windows, making it suitable for systems that need to support legacy software.
Overview of GPT
- Definition and Advancements: GPT is a modern partition style that has become the standard for contemporary computing. It is part of the UEFI (Unified Extensible Firmware Interface) standard, which allows for more advanced features.
- Size and Structure: Unlike MBR, GPT supports drives larger than 2TB, making it suitable for today’s high-capacity storage devices. This feature allows users to take full advantage of larger drives without partitioning constraints.
- Partition Flexibility: GPT offers a significant increase in the number of partitions; it can support up to 128 partitions on Windows systems without the need for extended partitions. This flexibility allows for more organized storage and easier management of data.
- Data Integrity and Recovery: GPT includes built-in redundancy and CRC (Cyclic Redundancy Check) protection, enhancing data integrity. In the event of corruption, GPT can restore data from a backup copy, making it more reliable compared to MBR.
Which Should You Choose?
- Modern Systems: For most users with new systems, GPT is the recommended choice due to its advantages in data storage and management. If you are using large drives or planning to implement advanced storage solutions, GPT can offer superior performance and reliability.
- Legacy Compatibility: However, if your system requires compatibility with older operating systems or legacy BIOS settings, MBR may be more suitable. This consideration is vital for users who need to ensure their drives can be read by outdated systems or software.
- Use Case Scenarios: Identifying your specific needs is crucial. If you primarily work with large files or are using applications that demand high storage thresholds, GPT is the better option. Conversely, if you are working in a legacy environment or using older hardware, MBR might better meet your requirements.
Making an Informed Decision
- Evaluate Your System and Needs: Before making a final decision, evaluate your current system’s compatibility and your future storage needs. Understanding the differences between MBR and GPT can help guide your choice effectively.
- Research and Resources: Utilizing online resources, community forums, and guides can provide further insights into personal experiences and recommendations based on specific use cases.
- Backup Your Data: Regardless of the partition style chosen, always ensure to back up your existing data before initializing or reformatting a drive. This precaution helps prevent data loss and safeguards important files.
Choosing between MBR and GPT is a significant decision that impacts how your drive will function within your system. MBR, although still used in some scenarios, is becoming less suitable for modern applications due to its limitations. GPT offers a more robust and flexible approach to partitioning, making it the preferred choice for most users today. By understanding your system requirements and considering the advantages of both standards, you can make an informed decision that best meets your needs when initializing a new hard drive.
Step-by-Step Guide to Initialize a Hard Drive
Initializing your hard drive can be broken down into simple steps. Here’s a detailed guide to walk you through the process:
1. Connect the Hard Drive
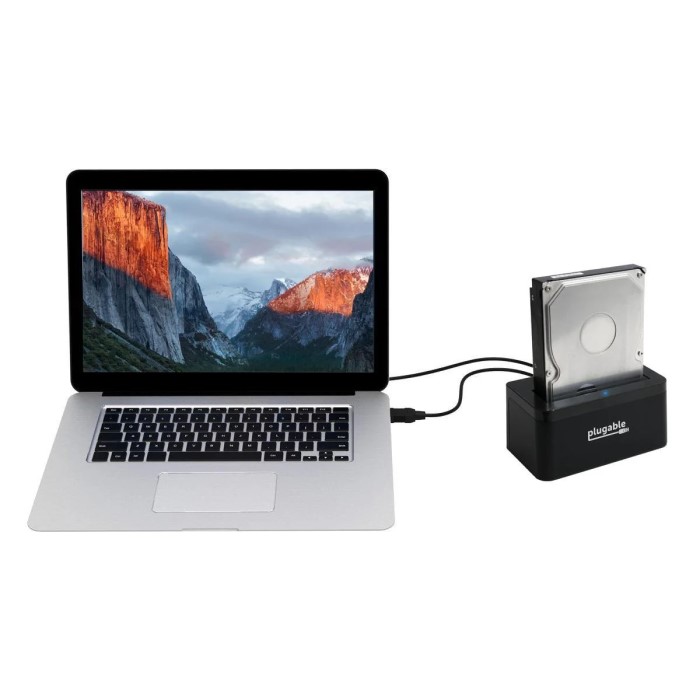
First, physically connect your new hard drive to your computer. For internal drives, this usually means connecting it via a SATA cable. For external drives, plug it into a USB port. Make sure the drive receives power and is detected by your system.
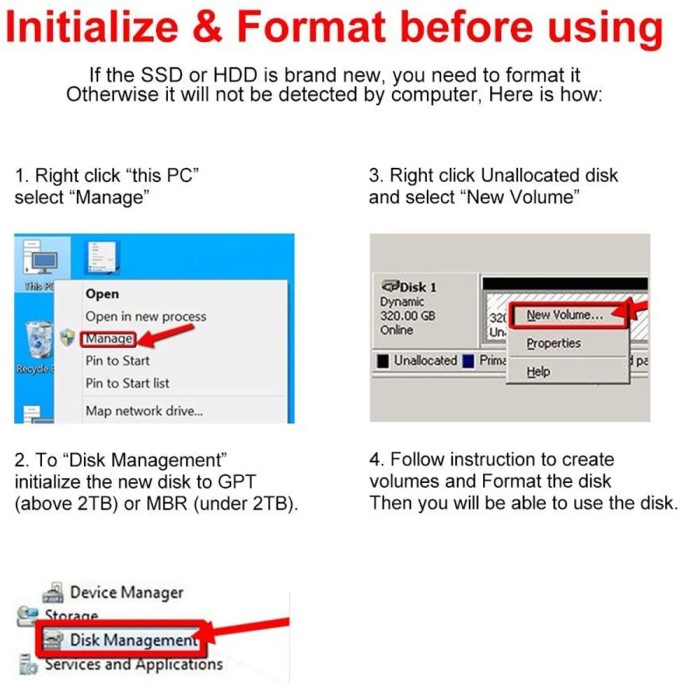
2. Open Disk Management
To begin the initialization process, you need to access Disk Management. To do this, right-click on the ‘Start’ button in Windows and select ‘Disk Management.’ This will open a window showing all connected drives, including your new hard drive.
3. Locate the New Drive
In the Disk Management window, you’ll see your new hard drive listed as ‘Unallocated’ or ‘Not Initialized.’ Right-click on this drive, and select ‘Initialize Disk.’ You will be prompted to choose a partition style.
4. Select the Initialization Method
At this point, you can select either MBR or GPT. Refer back to our previous discussion about the advantages of each. Once you’ve selected the desired partition style, click ‘OK’ to continue.
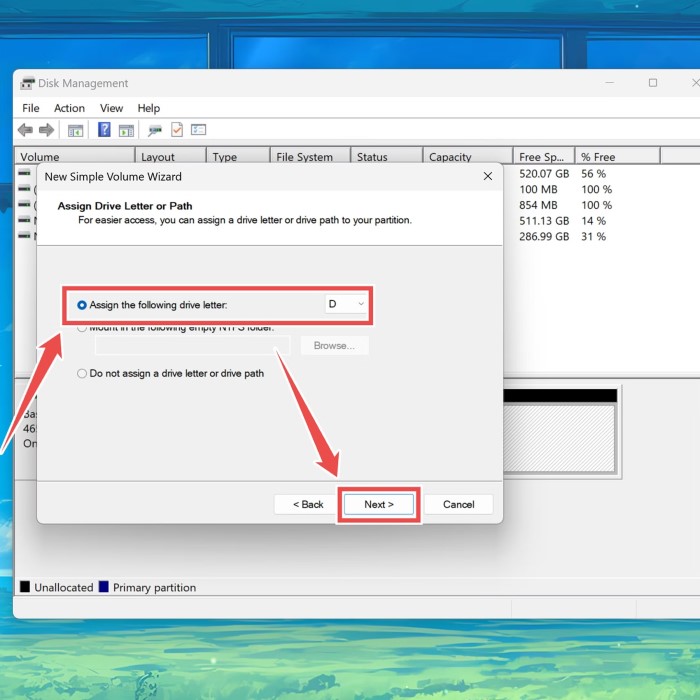
5. Create a New Volume
After initializing the disk, you still need to create a new volume. Right-click the unallocated space on your hard drive and select ‘New Simple Volume.’ This launches a wizard that guides you through assigning a drive letter, formatting the drive, and labeling it. Choose the appropriate file system (most users opt for NTFS) and click ‘Finish’ to complete the process.
6. Confirm Success
Once the wizard completes, your hard drive should appear in File Explorer under ‘This PC.’ You can now use it for storing files, installing applications, or as backup storage.
Troubleshooting Initialization Issues
While the process of initializing a hard drive is usually straightforward, sometimes users encounter issues. Here are some common problems and solutions if your hard drive won’t initialize:
1. Check Connections
First, make sure that all physical connections are secure. If you’re using an external drive, change the USB port or cable to rule out connection issues.
2. Update Drivers
Outdated drivers can prevent the operating system from properly detecting the new hard drive. Check your computer’s Device Manager for updates to your disk drivers and install the latest versions from the manufacturer’s website.
3. Disk Errors
Sometimes, errors can occur on the disk itself, hindering the initialization process. Use the built-in ‘CHKDSK’ utility to scan for and repair disk errors. Open Command Prompt as an administrator, type chkdsk X: /f (replace “X” with the letter of your hard drive), and hit enter.
4. Third-Party Tools
If you continue experiencing issues, consider using third-party disk management tools. Software like MiniTool Partition Wizard or EaseUS Partition Master provides user-friendly interfaces to troubleshoot hard drives effectively.
How to Completely Wipe and Reset a Hard Drive
If you need to dispose of or repurpose a hard drive, you may wonder, “Can you completely wipe and reset a hard drive?” The answer is yes. Here’s how you can wipe your hard drive securely:
1. Backup Critical Files
Before wiping your hard drive, ensure all important data is backed up elsewhere. Wiping the drive will delete everything, and recovery becomes challenging.
2. Format the Drive
To initiate the wiping process, you can format the hard drive. In Disk Management, locate the drive, right-click on it, and select ‘Format.’ Choose FAT32 or NTFS, depending on your requirements.
3. Use Data Wiping Software
For better security, consider using dedicated data-wiping software that ensures all data is irrecoverable. Programs like DBAN (Darik’s Boot and Nuke) or CCleaner provide options to overwrite data multiple times.
4. Physical Destruction (if necessary)
If the drive contains highly sensitive information, consider physically destroying the hard drive. Drilling holes through the drive or shredding it can guarantee that no data can be recovered.
Common FAQs About Hard Drive Initialization
Should I initialize MBR or GPT?
The choice largely depends on your intended use. If working with modern systems and larger drives, it’s best to choose GPT. For older systems, MBR may be suitable, though with restrictions.
How to fix a hard drive that won’t initialize?
Ensure your drives and connections are secure, update faulty drivers, run error checking for disk faults, or use third-party tools to attempt initialization when standard methods fail.
Can you completely wipe and reset a hard drive?
Absolutely, you can use built-in formatting options or dedicated wiping software to securely erase all data on your hard drive. Always back up important files first.
Conclusion
Understanding how to initialize a hard drive is vital for new users, especially as technology evolves in 2025. By following the steps provided in this guide, you’ll be capable of initializing your hard drive successfully, selecting the right partition style, and troubleshooting potential issues. Proper initialization not only optimizes your device’s performance but also prepares it for effective data management. With this knowledge, you can confidently set up your new hard drive and utilize its potential for all your data needs. Remember, whether you prefer MBR or GPT, understanding the initialization process is key to your success.