
Introduction: Understanding the Need to Wipe an External Hard Drive
In a digital age where data privacy is paramount, knowing how to wipe an external hard drive effectively is crucial. External hard drives are popular for storing large volumes of data, including sensitive information. Whether you’re selling, recycling, or simply upgrading your external hard drive, ensuring that all personal data is wiped clean is essential for protecting your privacy. This guide explores the best methods for securely wiping an external hard drive in 2025, providing you with practical steps and tips to ensure your data is completely erased.
Why It’s Important to Wipe an External Hard Drive
Wiping an external hard drive is crucial for data security. Even if files are deleted, they may still be recoverable. Proper erasure ensures privacy and protects sensitive information from falling into the wrong hands.
Risks of Leaving Data on External Drives
- Unauthorized Access: Old files may contain personal or business information. Hackers or thieves can exploit this data.
- Identity Theft: Personal data, like addresses and financial details, can lead to identity theft if retrieved.
- Corporate Espionage: For businesses, not wiping drives can lead to leakage of trade secrets or client data.
- Accidental Sharing: Selling or donating a device without wiping it may unintentionally expose your files.
Benefits of Securely Erasing Your Hard Drive
- Protects Privacy: Secure erasure ensures no one can access your personal or confidential data.
- Prevents Data Recovery: Proper wiping removes all traces of files, making recovery virtually impossible.
- Maintains Professional Reputation: For businesses, securely erasing drives helps protect intellectual property and client trust.
- Compiles with Legal Standards: Some industries require wiping drives to comply with data protection laws.
Wiping your external drive offers peace of mind and protects against numerous risks. Taking the extra step ensures your data stays safe.
Preparing to Wipe Your External Hard Drive
Wiping an external hard drive requires careful preparation to avoid losing crucial files. Proper steps ensure the process runs smoothly and securely.
Backing Up Important Data
Before wiping your drive, create a backup of any important files. Use cloud storage or an alternate hard drive for saving data. Double-check your backup to ensure nothing important is missed. This prevents permanent loss of valuable information.
Verifying Drive Compatibility and Condition
Ensure the external hard drive is compatible with your wiping method. Check if your operating system supports the drive’s format. Inspect the hardware for any damages or malfunctions. A faulty drive may hinder secure erasure or cause errors during the process. Verifying both compatibility and condition ensures a seamless experience.
Methods to Wipe an External Hard Drive
Several methods are available when deciding how to wipe an external hard drive. Each method depends on your goals, available tools, and desired level of data security.
Using Built-In Operating System Tools
Most operating systems provide built-in tools for wiping external hard drives effectively. These options are convenient and user-friendly.
- Windows Users: Use tools like File Explorer or Disk Management. These allow you to format or delete all data.
- Mac Users: Rely on Disk Utility. It provides features like “Erase” or “Secure Erase” for thorough cleaning.
- Formatting Options: Ensure you select a full format rather than a quick one for higher security.
Built-in tools are a beginner-friendly way to wipe your external drive securely.
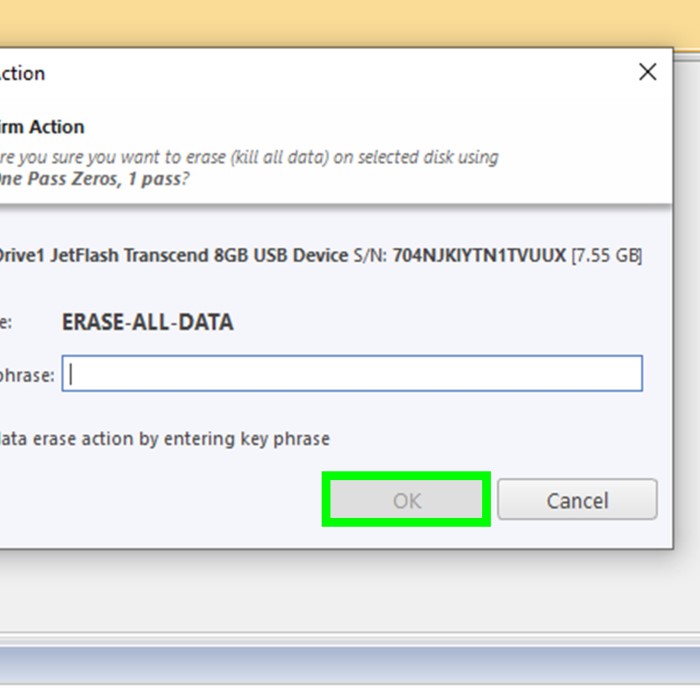
Using Third-Party Software for Secure Erasure
If you need enhanced data security, third-party software can help. Many tools offer advanced wiping algorithms:
- Popular Tools: Programs like CCleaner, DBAN, or Eraser securely erase data beyond recovery.
- Customizable Options: Many apps allow you to choose the number of overwrite passes for extra protection.
- Automation: Automate the wiping process for consistent results without errors.
Third-party software is ideal for those handling sensitive or confidential data.
Physically Destroying the Drive as an Alternative
For the ultimate level of security, physical destruction is an option. This method ensures the drive is entirely unusable.
Methods for Destroying an External Hard Drive
- Using Hammers
- One of the most straightforward methods for destroying a hard drive is by using a hammer.
- Striking the drive multiple times breaks the internal components and platters, making it impossible to recover data.
- Ensure you wear protective eyewear and gloves during this process to safeguard yourself against flying debris.
- Utilizing Drills
- Drilling holes through the hard drive is another effective way to render it unusable.
- Use a power drill with a suitable bit to create several holes in different areas of the drive.
- This method punctures vital components, further ensuring that recovery of data is not feasible.
- Employing Specialized Shredding Machines
- For those seeking a more professional approach, specialized shredding machines are available.
- These machines are designed specifically for destroying hard drives and often reduce them to tiny pieces.
- Many local businesses offer shredding services that can handle multiple hard drives securely and safely.
Irreversibility of Data Destruction
- Permanent Loss of Data
- Once a hard drive is destroyed using these methods, all data stored within becomes 100% unrecoverable.
- The physical damage ensures that even advanced data recovery techniques will not succeed.
- This complete loss of data provides peace of mind for individuals concerned with data security.
- Security Assurance
- By ensuring irreversibility, users can be confident that their sensitive information is no longer accessible.
- This level of destruction is particularly crucial for businesses handling confidential data that must be protected from potential leaks.
- Ultimately, choosing irreversible methods is vital for maintaining privacy and preventing identity theft.
Environmental Concerns
- Responsible Disposal
- After destroying the hard drive, care should be taken in how to dispose of the remnants.
- Electronic waste can contain harmful chemicals that pose risks to the environment.
- It is crucial to avoid simply throwing the destroyed parts in regular trash.
- Recycling Options
- Seek out designated e-waste recycling programs that can handle the disposal of electronic components safely.
- Many local communities offer collection events for electronic waste, ensuring responsible processing.
- By recycling electronic materials, users can reduce their environmental footprint and ensure hazardous substances are managed appropriately.
- Awareness of Environmental Impact
- Understanding the environmental impact of electronic waste helps foster responsible behavior among users.
- Educating oneself about proper disposal methods can contribute to a more sustainable approach to managing electronics.
- This awareness encourages not only personal responsibility but also broader societal efforts to minimize environmental harm from electronic waste.
Physical destruction is a last resort and only needed for highly sensitive information. These methods provide a range of options for wiping your external hard drive. Choose based on your requirements and level of data security needed.
Step-by-Step Guide: Wiping an External Hard Drive on Windows
Windows provides several tools to help you safely wipe an external hard drive. These tools are easy to use and effective for removing data. Below, we outline two commonly used methods: the Windows Format Tool and the Disk Management Utility.
Using Windows Format Tool
The Windows Format Tool is a quick and simple method to erase data. Follow these steps:
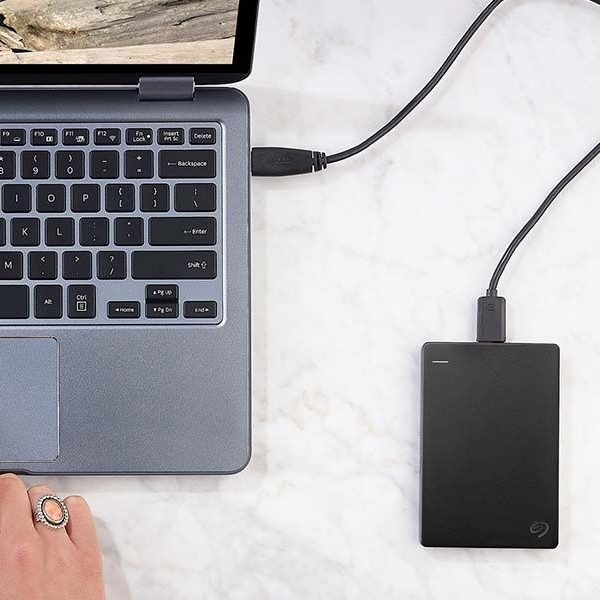
- Connect the Drive: Plug in your external hard drive to the computer.
- Open File Explorer: Locate “This PC” or “My Computer” on your desktop or Start menu.
- Right-Click the Drive: Find your external hard drive and right-click on its icon.
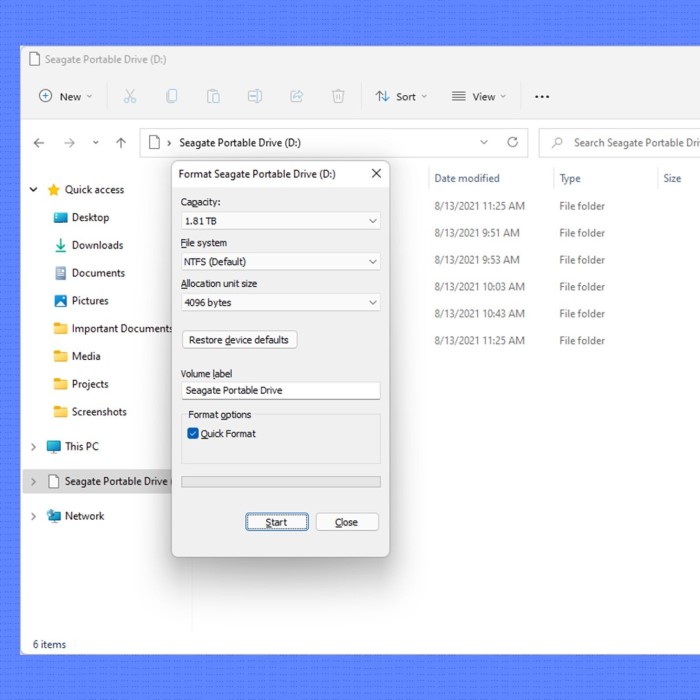
- Select “Format”: Click “Format” from the menu. A new window will appear.
- Choose File System: Select a file system (e.g., NTFS or exFAT) based on your needs.
- Uncheck “Quick Format”: To ensure better erasure, uncheck the “Quick Format” option.
- Start Formatting: Click “Start” to begin. Confirm when prompted.
This method deletes all data and prepares the drive for future use.
Using Disk Management Utility
Disk Management is another Windows tool for managing drives, including secure wiping. Here is how to use it:
- Launch Disk Management: Right-click the Start button and select “Disk Management.”
- Locate Your Drive: Find your external hard drive in the list of disks.
- Right-Click the Drive: Select “Format” or “Delete Volume,” depending on your goal.
- Format the Drive: Follow the on-screen instructions. Choose “NTFS” as the file system for most uses.
- Uncheck “Perform a Quick Format”: For better security, disable this option before proceeding.
- Confirm and Start: Click “OK” to finalize the process.
Disk Management offers flexible options and works well for complex setups. Both methods allow you to wipe your external hard drive. Choose based on your preference and time available.
Step-by-Step Guide: Wiping an External Hard Drive on Mac
To securely wipe an external hard drive on a Mac, macOS offers reliable tools. Disk Utility is the primary tool, with additional Secure Erase options ensuring complete data removal.
Using Disk Utility for Formatting
Disk Utility is a built-in macOS tool that allows you to erase and format drives.
- Connect Your Drive: Plug your external hard drive into the Mac.
- Open Disk Utility: Launch “Disk Utility” from the Applications folder or search it in Spotlight.
- Select the Drive: Click on your external hard drive in the left sidebar.
- Click “Erase”: Tap the “Erase” button on the toolbar.
- Choose Format and Scheme: Select a file system (like APFS or exFAT) and GUID Partition Map.
- Name the Drive: Enter a name for the drive if desired.
- Click Erase Again: Confirm and begin the formatting process.
This method removes all data and prepares the drive for new use. Formatting is effective but does not secure against advanced recovery tools.
Secure Erase Options on macOS
For sensitive data, use Secure Erase to enhance security. This ensures deleted data is unrecoverable.
- Access Disk Utility: Start “Disk Utility” as explained above.
- Select Your Drive: Highlight the external hard drive to wipe securely.
- Choose “Erase” and Security Options: Click “Erase” and then select “Security Options” (if available).
- Set Security Level: macOS lets you choose the number of overwrite passes. More passes provide better security.
- Confirm “Secure Erase”: When ready, finalize the process.
Secure Erase is essential when handling personal or confidential files. It protects against advanced recovery attempts. By following these steps, you can safely and effectively wipe your external hard drive on Mac. Choose the option that best meets your needs for data security.
Tips for Ensuring Data is Permanently Removed
Erasing an external hard drive securely ensures your data cannot be recovered. Knowing key steps and best practices can help guarantee complete removal.
Understanding Data Recovery Risks
- Software Recovery Tools: Deleted files may still be recoverable using advanced software solutions. Proper erasure prevents this.
- Incomplete Erasure: Partial formatting or quick formats leave traces of old data behind. These traces are vulnerable.
- Physical Drive Access: Unwiped drives, if stolen or unauthorized, may expose sensitive files to exploitation.
- Advanced Recovery Techniques: Recovery methods like disk forensics can retrieve data unless securely wiped. Only advanced erasure protects against this.
Understanding these risks highlights the importance of complete and secure data removal. This knowledge prevents your files from being reused or recovered by others.
Best Practices for Securely Erasing Drives
- Use Secure Wiping Tools: Employ professional software like DBAN, Eraser, or CCleaner for reliable data erasure.
- Perform Multiple Overwrites: Overwriting the drive several times makes file recovery impossible. Many tools offer this feature.
- Verify Erasure: After wiping, scan the drive to confirm all data has been erased securely.
- Avoid Quick Formatting: Quick formats skip thorough data removal. Always select full formatting options.
- Secure Physical Access: Protect your drive during the wiping process to avoid unauthorized data recovery.
- Destroy the Drive for Sensitive Data: When handling highly confidential files, consider physical destruction as a final step.
By following these best practices, you can ensure all files are completely removed. Opt for these methods to enhance security and peace of mind.
Common Mistakes to Avoid When Wiping an External Hard Drive
Wiping an external hard drive requires attention to avoid errors that can jeopardize data or security. Below are common mistakes and how to prevent them.
Forgetting to Back Up Data
- Risk of Permanent Loss: Many people forget to back up files before wiping a drive.
- Pre-Wipe Backup: Always save important documents to a cloud service or another hard drive.
- Double-Check Backups: Confirm all your files are safely stored before starting the erasure process.
- Stress-Free Approach: Proper backups reduce worries about losing critical information.
Using Inadequate Erasure Methods
- Quick Formats: These may leave data recoverable with basic software.
- Skipping Secure Options: Avoid methods that fail to overwrite files multiple times.
- Incomplete Tools: Not all built-in system tools ensure complete removal of sensitive data.
- Choose Reliable Software: Use trusted programs like DBAN or Eraser for advanced security.
- Verify Results: Scan the wiped drive to confirm all data is irretrievable.
By avoiding these mistakes, you can ensure your external hard drive is securely and efficiently wiped.
FAQs on Wiping External Hard Drives
Can Wiped Data Be Recovered?
Wiped data recovery depends on the method used to erase the drive. Basic deletion methods, like quick formatting, leave data vulnerable to recovery using specialized software. However, secure wiping methods, including multiple overwrite passes, make data recovery nearly impossible. Tools such as DBAN or macOS Secure Erase enhance protection against recovery efforts. If physical destruction is used, the data becomes completely unrecoverable. Always choose methods based on the sensitivity of the data you are erasing.
How Long Does It Take to Wipe a Drive?
The time needed to wipe a drive depends on several factors:
- Drive Size: Larger drives take more time to wipe than smaller ones.
- Method Used: Quick formats are faster, while multiple overwrites require more time.
- Software Performance: Third-party tools may offer speed optimization but still depend on the drive’s capacity.
- Computer Speed: Faster systems can handle wiping processes more quickly.
For instance, securely wiping a 1TB hard drive with multiple passes can take several hours. Plan the wiping process when you have ample time to complete it. Efficient execution ensures that the data removal is thorough and effective.
Conclusion: Making Wiping Your External Hard Drive Easy
Now that you know how to wipe an external hard drive, including the best methods to ensure your privacy and data security, you’ll be well-equipped for any situation. Whether using built-in tools, third-party software, or physical destruction, always prioritize your safety and privacy. A proper wipe not only protects your data but also prepares your drive for future use or disposal. With these methods in hand, take the proactive step of safeguarding your information and ensuring that your external hard drive is clean for its next chapter. By following these guidelines, you can confidently manage your data and experience peace of mind as you navigate your digital ecosystem.