
Understanding OBS and Its Importance for Streaming
Open Broadcaster Software, commonly known as OBS, has become one of the most popular tools for live streaming and video recording. It offers various features that allow users to create professional-level broadcasts without the need for expensive equipment. One essential component of a successful livestream is incorporating a webcam, which personalizes the stream and engages viewers effectively. Adding a webcam to OBS can seem daunting at first, especially for beginners. However, with clear and straightforward instructions, you can quickly learn how to add webcam to obs. This guide will walk you through each step, ensuring that your livestreams are visually appealing and engaging.
What is OBS and Why Use It?
OBS (Open Broadcaster Software) is a free, open-source software for video recording and live streaming. It is widely used by gamers, content creators, and professionals for its versatility. OBS works on Windows, macOS, and Linux, making it accessible to almost everyone. It offers extensive features that help create high-quality streams and recordings. Let’s explore why OBS is a top choice for streaming.
Overview of OBS Features
OBS is packed with powerful features designed to meet diverse streaming needs:
- Multiple Source Integration: OBS allows seamless use of different sources like webcams, screens, and images.
- Scene Switching: Easily switch between scenes for dynamic content presentations.
- Audio Mixer: OBS offers built-in audio adjustments for perfect sound balance.
- Custom Layouts: Personalize your stream with multi-layer layouts and text.
- Advanced Encoding Options: OBS supports superior encoding for better video quality and minimal lag.
These features make OBS a comprehensive solution for professional-grade broadcasting.
Benefits of Integrating a Webcam with OBS
Connecting a webcam to OBS enhances your streaming experience significantly:
- Improved Engagement: Webcams help build trust by showcasing real-time interactions.
- Personal Connection: Adding your face creates a personal touch, boosting viewer connection.
- Professional Appeal: Webcam integration upgrades the visual quality of your content.
- Additional Features: OBS allows easy customizations, such as overlays and filters, for your webcam feed.
Using a webcam in OBS is a simple way to create visually appealing and engaging content.
Preparing Your Webcam for OBS Integration
Proper preparation ensures smooth integration of your webcam with OBS. Begin by verifying compatibility and installing necessary drivers. This approach helps in avoiding issues during setup.
Checking Your Webcam’s Compatibility
Compatibility is crucial when using a webcam with OBS. Confirm that your webcam works with your operating system. Most modern webcams support Windows, macOS, and Linux. Make sure your webcam supports the resolution and frame rate you intend to use. Check the manufacturer’s website for device specifications. If using an older webcam, verify OBS supports the required video input format.
Installing Webcam Drivers and Software
Webcam drivers and software are needed for proper functionality. Most webcams today are plug-and-play and require minimal setup. However, some devices need specific drivers for advanced features. Visit the webcam manufacturer’s website to download the latest drivers. Install the drivers following provided instructions. If additional software is available, use it to configure settings or test functionality. Update drivers regularly to prevent compatibility issues while streaming.
Downloading and Setting Up OBS Studio
To begin adding your webcam to OBS, you need to download and set up OBS Studio properly. It is crucial to ensure the software is obtained from a trusted source and installed correctly for optimal performance.
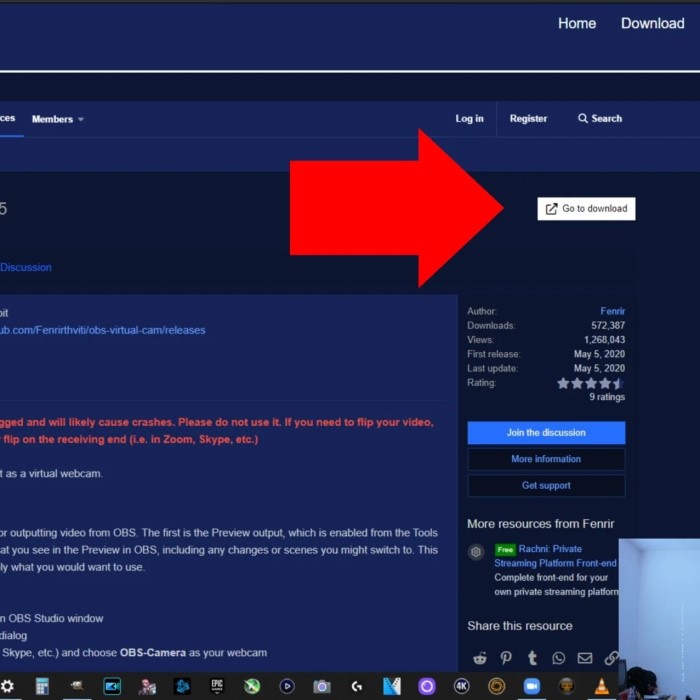
Where to Download OBS Studio Safely
Downloading OBS Studio from reliable platforms is essential. Always use the official OBS website to avoid malware or outdated versions. The software is free and available for Windows, macOS, and Linux systems. Third-party download sites may pose risks to your device, so avoid them. Check your system requirements before downloading to ensure compatibility. For best results, download the latest version, as it includes updated features and bug fixes.
Installing OBS: Step-by-Step Instructions
Installing OBS Studio is straightforward. Follow these steps for a seamless setup:
- Locate the Downloaded File: Once downloaded, find the installation file on your computer.
- Start Installation: Double-click the file to launch the installation wizard.
- Agree to Terms: Review and accept the software agreement to proceed.
- Choose Installation Folder: Select an installation directory or leave it as the default.
- Install Components: Ensure all necessary components are selected for installation.
- Complete the Setup: Click ‘Install’ to begin the process. Wait until installation completes.
- Open OBS Studio: Launch the program to check if it runs correctly.
Following these steps allows you to prepare OBS Studio effectively for your webcam integration. Once installed, you can proceed to add your webcam source and optimize settings for streaming or recording purposes.
Adding a Webcam Source in OBS
Adding a webcam source is vital for streaming with OBS. This step integrates your webcam into your setup. Follow these instructions to properly set it up.
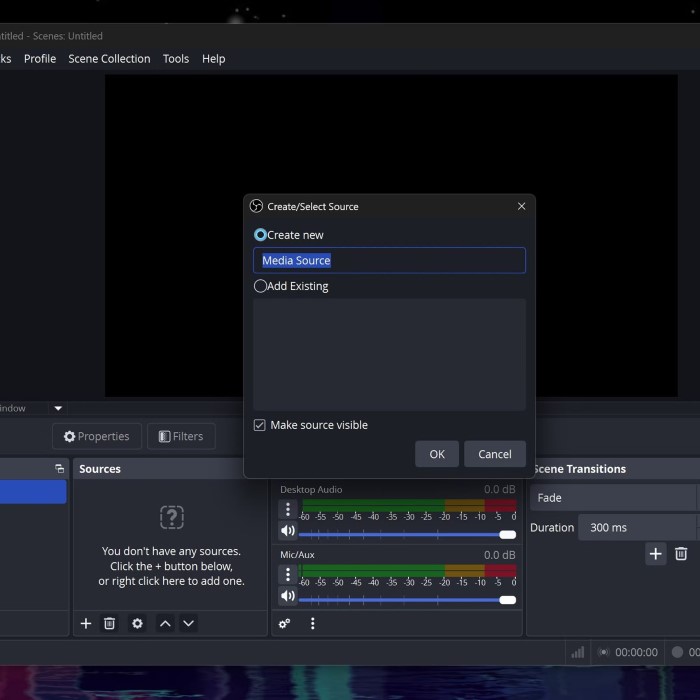
Navigate the OBS interface to locate relevant settings. After launching OBS Studio, you will see the main workspace with different panels. Use the Sources panel to manage video input devices like webcams. Click the + button in the Sources panel to add a new source. Select “Video Capture Device” from the dropdown menu to proceed. Name the new source for easy identification, then click “OK” to begin configuration. OBS offers a user-friendly layout, helping you manage video and audio sources seamlessly.
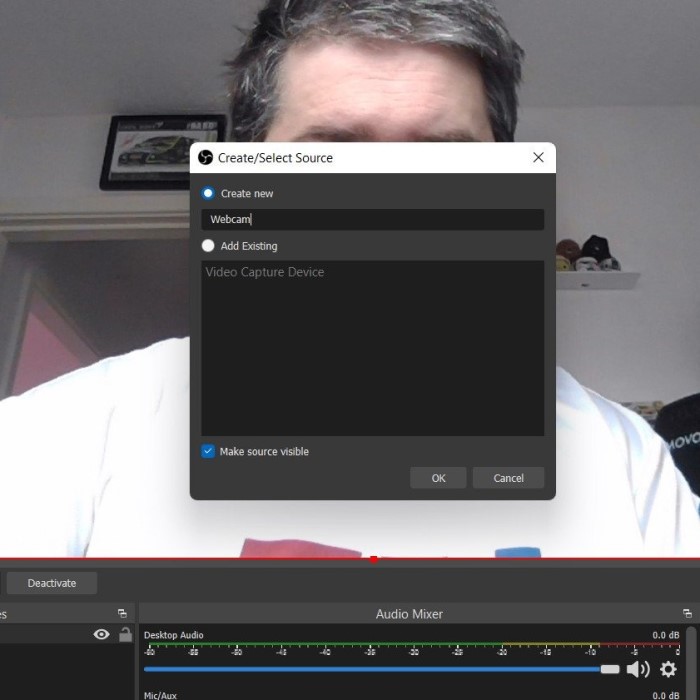
Selecting Video Capture Device
OBS requires selecting the correct video capture device for your webcam. Under the “Properties” window, choose your webcam from the device list. Ensure the name matches your webcam model or USB input. Test functionality by checking for live feed visibility in OBS. If multiple devices appear, select the correct one to prevent errors. The selection process ensures your webcam works properly in OBS.
Configuring Basic Webcam Settings
Configure basic camera settings for optimal performance. Adjust resolution and FPS in the “Properties” menu based on your needs. Higher resolutions provide better clarity, while balanced FPS ensures smooth streaming. Set “Video Format” options to default settings unless you need advanced adjustments. Preview the video feed to confirm it aligns with your expectations. Modify brightness and contrast sliders if needed for better lighting effects. These settings create a high-quality webcam feed for your OBS stream.
Optimizing Webcam Settings in OBS
How to add webcam to obs? To ensure high-quality output, optimizing your webcam settings in OBS is essential. These adjustments refine video clarity and enhance the overall streaming experience. Each setting offers flexible customization depending on your needs.
Adjusting Resolution and Frame Rate
The resolution and frame rate directly affect the visual quality of your stream. Follow these steps to adjust them:
- Access Webcam Properties: Click on your webcam source in the OBS “Sources” panel.
- Set Resolution: Choose a resolution that balances clarity and performance. Options include 720p, 1080p, or custom sizes.
- Adjust Frame Rate: Frames per second (FPS) settings like 30 or 60 FPS ensure smooth video playback.
- Optimize for Your System: Select settings suitable for your computer’s performance and internet bandwidth.
Preview your changes to ensure the resolution and frame rate align with your expectations.
Managing Color Correction and Filters
Color correction creates a polished and professional appearance for your video feed. OBS offers built-in controls for these adjustments:
- Access Filters Menu: Right-click your webcam source and choose “Filters” from the context menu.
- Adjust Brightness and Contrast: Tweak these sliders to make your webcam feed vibrant and well-lit.
- Modify Saturation and Gamma: Use these to fine-tune color levels and brightness balance.
- Add Filters: Apply effects like chroma key for green screen setups or LUTs for specific moods.
Experiment with different values until you achieve a visually appealing result.
Using Crop and Resize Features
Cropping and resizing are helpful for customizing the webcam frame within your stream layout. Here’s how to use these features:
- Crop the Video Feed: Hold the “Alt” key while dragging the webcam borders to crop sections.
- Resize the Feed: Click and drag the edges of the webcam frame to change its size.
- Position on Layout: Move your webcam feed to an area that complements your stream design.
- Maintain Aspect Ratio: While resizing, press “Shift” to alter the aspect ratio if necessary.
These features ensure your webcam feed integrates seamlessly into your scenes.
By fine-tuning these settings, you can create a visually engaging and professional-looking stream.
Troubleshooting Common Issues
How to add webcam to obs? When using OBS with a webcam, technical problems can occasionally arise. Addressing these effectively is critical to maintain a seamless streaming experience. Below, we delve into common issues and solutions to keep your setup running smoothly.
Webcam Not Showing in OBS
A blank camera feed in OBS can be frustrating. Here’s how to resolve it:
- Check Camera Connection: Ensure your webcam is securely plugged in and powered on.
- Verify Webcam Selection: Go to the source’s properties in OBS and confirm the correct device is chosen.
- Close Conflicting Applications: Other apps using the camera (e.g., Zoom) may block OBS access. Close them before reopening OBS.
- Restart OBS and Computer: Restart OBS or your PC to refresh device detection.
- Update Webcam Drivers: Outdated drivers can cause issues. Update them from the manufacturer’s website.
- Check System Permissions: On macOS or Windows, grant camera access to OBS in system settings.
- Test Webcam Functionality: Use another app to ensure the webcam itself is working properly.
If these steps don’t solve the problem, try disabling and re-enabling the webcam source in OBS.
Fixing Video Lag or Stuttering
Video lags can reduce the quality of your streams significantly. Address this with the following steps:
- Ensure USB Bandwidth: Use a faster USB port or ensure no other devices are straining the connection.
- Adjust Webcam Settings: Lower the resolution or frame rate in OBS to reduce demands on your system.
- Check Computer Performance: Close unnecessary programs to free up system resources.
- Optimize Encoding Settings: In OBS, select a faster preset or lower bitrate to reduce CPU strain.
- Update OBS Software: Older versions may have bugs. Always use the latest release.
- Check Internet Stability: Slow internet can cause buffering. Use a reliable connection.
Test different combinations of settings to find the best performance balance between quality and smoothness.
Addressing Audio Sync Problems
Audio and video out of sync can frustrate viewers. Sync them using these steps:
- Check Audio Delay in OBS: Go to the “Advanced Audio Properties” menu. Adjust the sync offset for your microphone.
- Set Matching Frame Rate: Ensure the microphone and webcam have the same processing rate.
- Test External Devices: If using an external camera and microphone, confirm they sync properly before streaming.
- Update Audio Drivers: Keep your sound hardware’s firmware or drivers up to date.
- Restart OBS and Test: Restarting OBS can often fix minor audio glitches.
By addressing sync issues early, you ensure a professional audio-visual experience for your audience.
Resolving these problems can significantly enhance the reliability and appeal of your streams in OBS.
Enhancing Webcam Setup for Streaming
Enhancing your webcam setup in OBS can transform your streams. This helps create engaging and professional content. Simple tweaks and additions can significantly improve video and audio quality.
Adding Overlays and Effects
Overlays and effects make your stream visually appealing. OBS provides tools to customize your webcam feed:
- Adding Text or Image Overlays: Include your name, logos, or a countdown timer. Click the + in the Sources panel and select “Text” or “Image.”
- Using Filters: Apply OBS filters like chroma key for green screen setups. This adds creative backgrounds.
- Customizing Scenes: Arrange webcam feed with graphics or animations to suit your visual theme.
- Additional Plugins: Download OBS plugins for unique effects or enhanced visuals.
These features make your stream layout dynamic and engaging for viewers.
Pairing with External Microphones
Good audio quality is crucial for professional streams. Pairing your webcam with an external microphone improves sound clarity:
- Better Audio Capture: External microphones reduce background noise compared to built-in webcam microphones.
- Connecting Microphones: Plug your microphone into your computer and configure it within OBS.
- Sync Audio with Video: Adjust audio delay in OBS to match your webcam’s video feed.
- Test Mic Levels: Use the OBS audio mixer to balance input levels.
An external microphone enhances viewer experience with crisp and clear audio.
Tips for Professional Video Appearance
A polished video presentation makes your stream look professional. Follow these tips for better video quality:
- Good Lighting: Use soft lighting or a ring light to avoid harsh shadows. Place lights behind your webcam.
- Maintain Eye Contact: Position the webcam at eye level for a natural and engaging look.
- Tidy Background: Keep your surroundings clean or use a digital background for visual clarity.
- Dress Appropriately: Wear solid colors to avoid distractions, especially with chroma key setups.
- Stable Camera Position: Avoid shaking by securely mounting your webcam.
These practices help you deliver high-quality visuals to your audience.
Saving and Testing Your Webcam Configuration
Properly saving and testing your webcam configuration ensures consistency and quality during streaming or recording. These steps ensure a hassle-free process for your next broadcast.
How to Save Layouts in OBS
Saving layouts helps preserve your customized setup. Here’s how you can save your configurations:
- Organize Scenes and Sources: Arrange webcam, overlays, and other elements in the desired positions.
- Access Scene Collection: Click on “Scene Collection” in the top menu.
- Create a New Collection: Select “New” and name your scene collection for easy identification.
- Save Settings: OBS automatically saves changes in the new scene collection.
- Backup Your Layout: Export the scene collection from “Scene Collection > Export” for added security.
This method helps quickly switch between pre-configured layouts for different streaming needs.
Testing Your Webcam Performance Before Streaming
Testing ensures your webcam is ready and performs efficiently during a live stream. Follow these practical steps:
- Preview Webcam Feed: Open OBS and verify the webcam feed is visible in the Sources panel.
- Check Resolution and Frame Rate: Ensure settings match the desired quality, like 1080p at 30 FPS.
- Test Audio Sync: Confirm audio and video align for a seamless viewer experience.
- Verify Lighting: Check your webcam lighting and adjust placement for optimal visuals.
- Test Internet Connection: Ensure stable internet for streaming without interruptions.
- Run a Short Test Stream: Set up a private stream to confirm all configurations work correctly.
Regular testing ensures your webcam setup is reliable for professional streaming every time.
Conclusion: Enhancing Your Streaming with OBS
Now that you’ve learned how to add webcam to obs, you can take your live streams to a new level! Remember that practice makes perfect. As you continue to stream, you’ll find your style and settings that work best for you.
Whether you plan to host gaming streams, tutorials, or virtual meetups, integrating your webcam will create a more personal connection with your audience. With these easy setup instructions, you’ll be well on your way to engaging and dynamic broadcasts.
Start creating your streaming content today, and leverage the power of OBS for compelling live interactions. Happy streaming!