Introduction: The Importance of Knowing How to Remove Keyboard Switches
Understanding how to remove keyboard switches is essential for anyone who uses a mechanical keyboard. Whether you’re looking to replace a faulty switch, clean your keyboard, or customize your typing experience, knowing the proper techniques can make a significant difference. As keyboards continue to evolve, having the skills to manage them properly becomes critical in 2025.
In a world where every keystroke matters, keyboard enthusiasts are constantly seeking ways to improve their typing experiences. Whether it’s swapping out old switches for a new feel, cleaning debris that has built up over time, or customizing backlighting, the benefits extend beyond aesthetics. This article will guide you through the best techniques for removing keyboard switches with ease, helping you avoid common pitfalls along the way.
Understanding Keyboard Switch Types
Types of Keyboard Switches
Before diving into removal techniques, it’s essential to understand the different types of keyboard switches available. This knowledge will inform your approach to removal since not all switches are created equal.
- Cherry MX Switches:
- These are among the most popular mechanical switches. They are available in various types (e.g., Red, Blue, Brown), each providing a different tactile feedback.
- Cherry MX switches are popular for both gaming and typing due to their durability and reliability.
- Kailh Switches:
- These switches are becoming increasingly popular. They offer a range of color-coded options for different feedback characteristics.
- Kailh switches are often more budget-friendly, making them a favorite for DIY keyboard builders.
- Gateron Switches:
- Gateron switches are known for their smoothness. They are often compared to Cherry MX but tend to be less expensive.
- Gateron offers a variety of options, including custom versions for specific preferences.
- Optical Switches:
- This newer type uses light-based actuation, which can provide a faster response time. However, they also require specific PCB compatibility.
- Optical switches are especially favored by competitive gamers for their speed.
Understanding the type of switch you have is crucial. Making a distinction between hot-swappable and non-hot-swappable keyboards will also influence your process for removing switches.
Preparing for Switch Removal
Necessary Tools and Equipment
Before you attempt to remove any keyboard switches, it’s imperative to gather the necessary tools to ensure a smooth and safe process. Having the right equipment will help you avoid damaging your keyboard and make the task much easier. Depending on your keyboard type, here are the essential tools to consider:
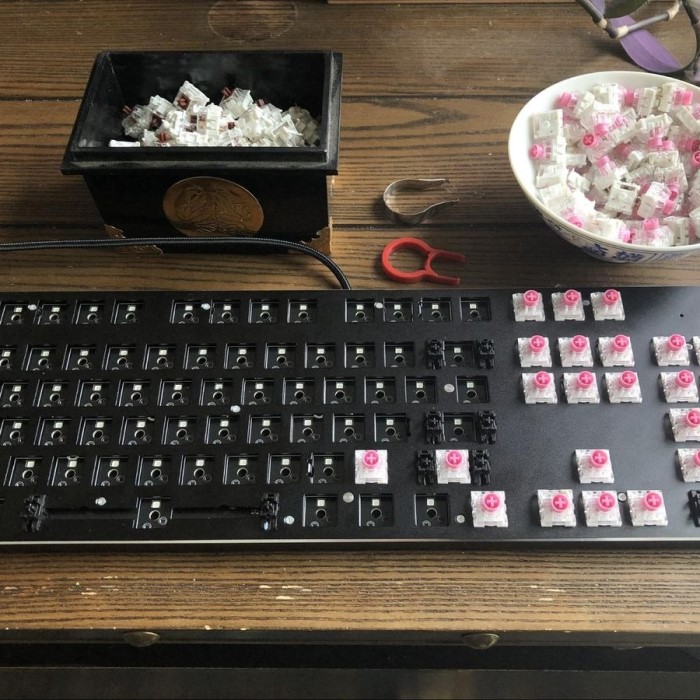
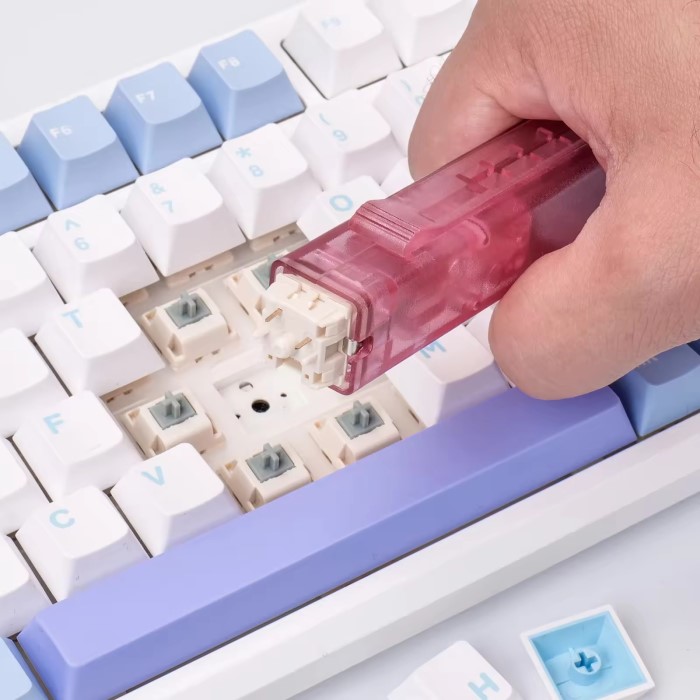
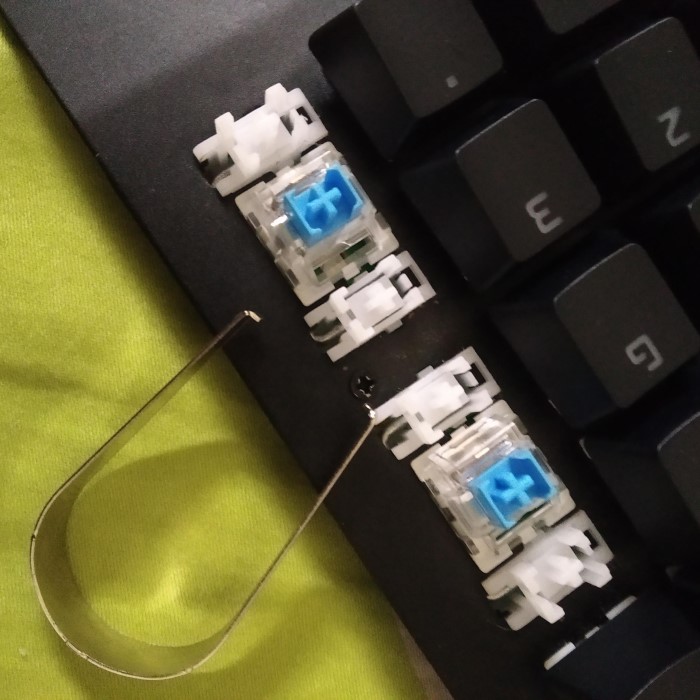
Switch Puller Tool
- Functionality: A switch puller is specifically designed to remove keyboard switches easily and safely. This tool is invaluable because it minimizes the risk of damaging the keyboard or surrounding components.
- Grip Design: The switch puller features a gripping mechanism that securely holds the switch, allowing you to pull it out without applying excessive force. This ensures a clean removal and reduces the likelihood of scratching or breaking nearby switches or the PCB (Printed Circuit Board).
- Compatibility: Make sure your switch puller is compatible with the type of switches in your keyboard, whether they are mechanical or specialized switches. Some pullers work better with certain styles of switches, so check for compatibility before purchasing.
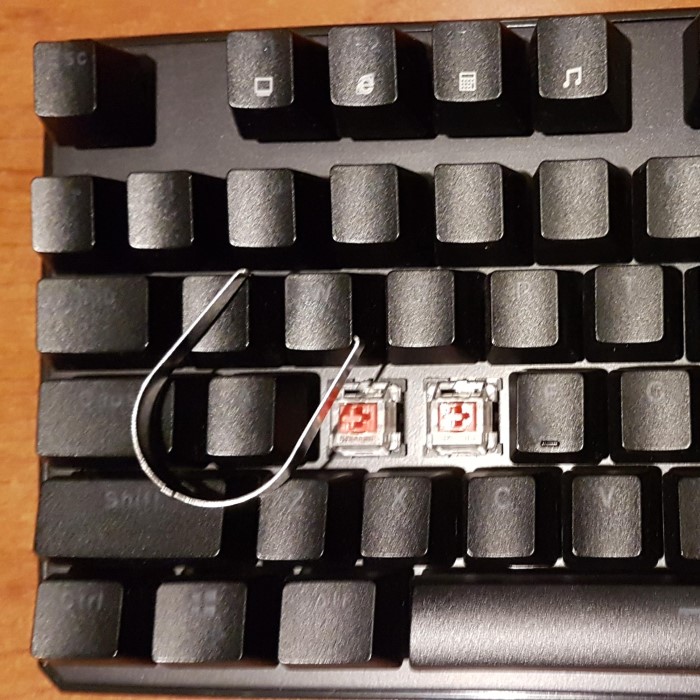
Keycap Puller Tool
- Purpose: Before removing the switches themselves, you may need to take off the keycaps. A keycap puller is an essential tool for this step, helping you avoid damage to the keycaps or the key switches below.
- Types of Pullers: There are two main types of keycap pullers: wire and plastic. Wire pullers provide a more delicate touch, making them ideal for standard keycaps, while plastic pullers might be needed for specialty keycaps that require extra care.
- Using the Tool: Position the keycap puller around the keycap, apply gentle pressure, and pull straight up to avoid bending the switches. This will help protect both the keycap and the underlying switch from damage.
Microfiber Cloth and Cleaning Solutions
- Maintain a Clean Workspace: Keeping your workspace clean is crucial when working on your keyboard. A microfiber cloth can help you maintain cleanliness while you disassemble and reassemble your keyboard.
- Cleaning Solutions: In addition to the cloth, consider using mild cleaning solutions that are safe for electronic components. This will help remove dust or grime from the switches, PCB, and other areas as you work on the keyboard.
- Prevent Residue: Ensure that any cleaning solutions used do not leave behind residues that could interfere with the keyboard’s operation. A clean workspace not only improves your efficiency but also contributes to the longevity of your keyboard.
Tweezers
- Precision Handling: Tweezers are useful tools for picking out stubborn bits of debris or for holding tiny components securely as you work. Their precision allows for careful manipulation of small parts in tight spaces.
- Types of Tweezers: Opt for tweezers with fine tips that provide maximum control. Anti-static tweezers are particularly beneficial, as they help prevent any electrical discharge that could damage sensitive components.
- General Use: Besides assisting in cleaning, tweezers can also be handy when working with various keyboard components, such as stabilizers or tiny screws that might require extra attention.
Safety Glasses
- Eye Protection: Although not commonly necessary, wearing safety glasses can protect your eyes from accidental debris while you are working on your keyboard.
- Preventing Injuries: During the removal process, small parts may fly off, and having safety glasses minimizes the risk of getting hurt. It’s always better to be cautious, especially when working in environments with potential hazards.
- Setting a Safe Work Environment: Adopting safety measures like wearing glasses helps create a culture of safety, encouraging you to be more mindful of your surroundings and the tools you are using.
Techniques on How to Remove Keyboard Switches
Step-by-Step Process
Now that you’re equipped, let’s explore how to remove keyboard switches effectively. The process will vary slightly depending on the type of switches you have.
Hot-Swappable Switches
- Power Off and Disconnect:
- Before starting, power down your keyboard and disconnect it from your computer. This ensures that you won’t accidentally trigger any functions during the process.
- Use a Switch Puller:
- Position the switch puller around the switch you want to remove. Ensure that it grips both sides securely.
- Gently Pull Up:
- With a steady hand, pull the switch vertically. Hot-swappable switches should lift out easily. Avoid using excessive force.
Non-Hot-Swappable Switches
- Remove Keycaps First:
- Use a keycap puller to gently grip and pull off the keycaps above the switches you want to remove. Take care not to damage the keycaps during this process.
- Unscrew the Keyboard Case:
- Depending on your keyboard design, you may need to unscrew the case to gain access to the switches. This often involves unscrewing screws on the back and separating the top and bottom halves of the keyboard.
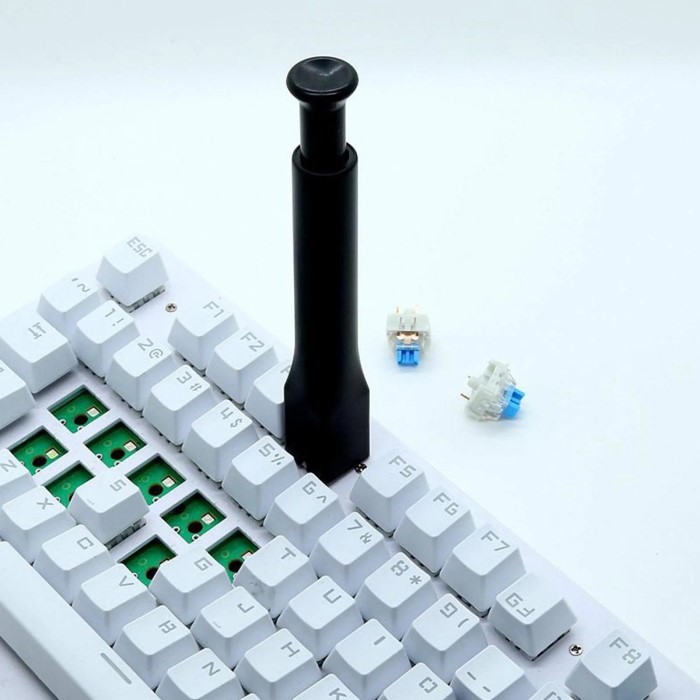
- Desoldering the Switches:
- This is more advanced and requires soldering tools. Heat the soldering iron and carefully apply it to the pins of the switch to melt the solder, then gently lift the switch out.
- Be cautious, as improper techniques can damage the PCB or surrounding components.
- Clean the Area:
- After removal, clean any debris from the keyboard area using a microfiber cloth. This prepares the area for new switches or reassembly.
Common Mistakes to Avoid
Key Pitfalls
While the removal process is relatively straightforward, there are common mistakes to be aware of:
- Forgetting to Disconnect Power:
- Always ensure the keyboard is unplugged. Failing to do so risks electrical shorts or damage.
- Using Excessive Force:
- Pulling too hard can break switches or damage the keyboard’s PCB. Patience is critical.
- Ignoring Keycap Replacement:
- Ensure that your keycaps fit the new switches properly. Not all keycaps are compatible with all switches.
- Neglecting Maintenance:
- Regular cleaning and maintenance can prevent buildup that complicates switch removal later. Make it a habit to clean your keyboard regularly.
FAQs
Can you remove switches without a tool?
While it’s possible to remove switches without a tool, it’s not recommended. Tools help ensure you don’t damage the switches or the keyboard itself.
How to remove switches from keyboard?
To remove switches, use a switch puller for hot-swappable switches or desolder them for non-hot-swappable ones. Always disconnect the keyboard before starting.
How to remove keyboard switches without tool Reddit?
Some users suggest using flat plastic objects like credit cards to pry out switches carefully, but this can be risky and may damage the keyboard.
How to remove keyboard keys without a tool?
You can remove keys without tools by gently pulling them off with your fingers. However, this approach is not recommended for mechanical keyboards due to the possibility of breaking keycaps.
Conclusion: Mastering Switch Removal for Your Keyboard
In conclusion, mastering the techniques on how to remove keyboard switches is essential for maintaining and customizing your mechanical keyboard. With the right tools and knowledge, you can ensure a smooth process, whether you are replacing faulty switches or cleaning your keyboard. Remember to always take your time, respect your equipment, and enjoy the satisfaction of personalizing your setup. As keyboard technology continues to evolve in 2025, being informed about maintenance and repair will empower you to get the most from your gear.
The knowledge you’ve gained can enrich not only your own experience but also inspire others in the community. Armed with this guide, you are ready to tackle your keyboard modifications confidently. Happy typing!